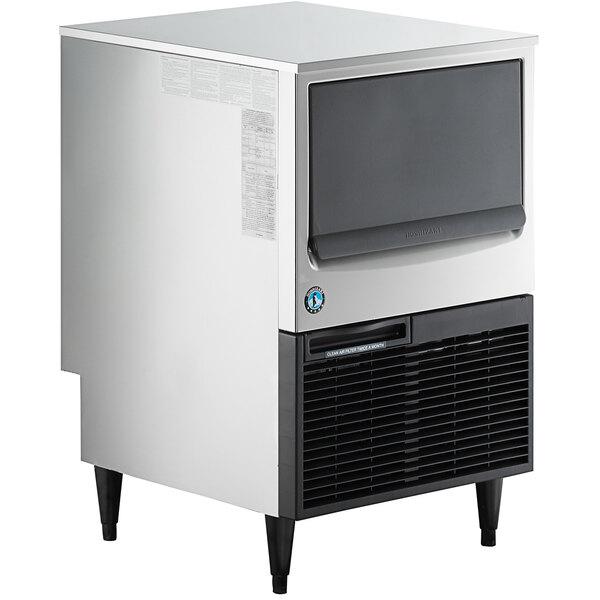
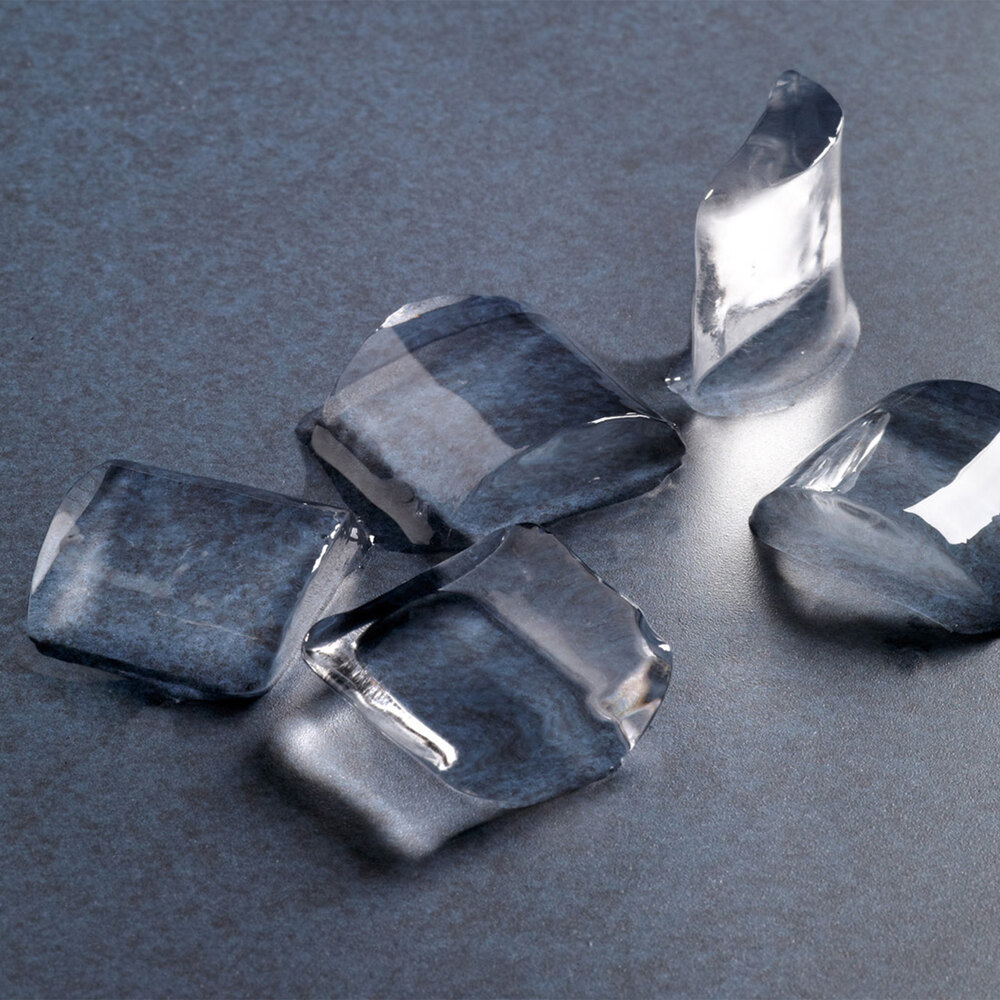
This video will demonstrate the proper way to perform the 10 minute check-out procedure for a system diagnosis of the KM cuber. Before we see how to diagnose electrical and component failures, let’s review the KM cuber’s sequence of operation. First, the unit always starts in the 1 minute fill cycle. Sixty seconds later, the initial harvest begins. Three to four minutes later, the freeze cycle begins. Longer harvest may occur in colder climates. After an average freeze time of approximately 30 minutes, the pump-out cycle occurs. Ten to twenty seconds later, the normal harvest begins. The KM cuber will continue to cycle until the bin control opens to stop the ice production. The first step in the 10 minute check-out procedure is to make sure there is adequate water and power supplied to the unit. When trouble shooting for system failures, remove the front panel, turn the ice maker off, and remove the control box cover. Now turn the unit back on. Remove the evaporator cover and make sure water is entering the reservoir. If there is no water coming in, check the bin control. The bin control contacts supply power to all the other controls in the unit. To check the bin control, flip the unit switch to the “wash” position. In the pump starts, it indicates that the bin control is closed. Next, check the cleaning valve micro switch. Flip the unit switch back to the ice making position. If there is still no water entering the evaporator, check the position of the cleaning valve handle. This handle must be in the horizontal position in order for the micro-switch, located behind the handle, to close. This micro-switch supplies control voltage to the control board. The cycle will not start without control voltage. A quick check of the control transformer secondary will verify that control voltage is present. If the 1 minute fill does not begin after you have checked the bin control and cleaning valve, check for 115 volts to the water valve. Check the terminals of the inlet water valve. If you have voltage, you can assume there is a problem with the water valve. Before replacing the water valve, check the inlet stream for debris. To do this, shut off the water and unscrew the thumbnut behind the water valve. Push the water line aside and inspect the screen. Clean or replace the screen as necessary. Check the water valve coil and diaphragm for problems and replace the water valve if necessary. After correcting the water valve problem, turn the machine on. The ice maker should cycle through the 1 minute fill and start the initial harvest cycle. If the initial harvest cycle does not start after 1 minute, check the float switch. Unplug the float switch and check for continuity with your own meter. If it is not closed and water is in the reservoir, the float switch is either dirty or defective. Clean it and check it to assure proper operation. If the float switch is good, the control board timer is defective and the board should be replaced. If the ice maker cycles into the initial harvest, the float switch is closed and the 1 minute timer works. A minute or so into the harvest cycle, the inlet to the evaporator should feel warm to the touch. As the hot gas circulates, the thermistor at the evaporator outlet reaches 48 degrees. The length of time it takes to reach 48 degrees depends on the ambient conditions and the water temperature. The length of harvest will automatically adjust to be longer in the winter and shorter in the summer. If the evaporator is not warming up, the first place to check is the hot gas valve. Lightly touch the discharge line to see if it is hot. If the discharge is not hot, then there is an obvious refrigeration problem and you’ll have to troubleshoot the system using basic refrigeration practices. If the discharge line is hot, but there is no heat coming from the outlet of the hot gas valve to the evaporator, you should check for coil voltage. To check for voltage, pull the tin pin connector out about 3/8” and check from the pin on the pink wire, which is the hot gas valve, to a neutral white wire. If you get proper voltage, the control board is working. If not, the problem is the control board. If you do get voltage, check the coil to be sure it’s energized. To do this, lay a metal paperclip on the coil. If you can feel a magnetic pull, the coil is energized. If the coil is in fact energized, it is possible that the hot gas valve is stuck. A stuck valve should be replaced using proper refrigeration practices. With normal operation of the hot gas valve, the evaporator will warm. At 48 degrees, the thermistor will start the defrost completion timer. The average harvest cycle and average ambient temperatures will range from 2-4 minutes. Longer harvest will occur with colder supply water or if the defrost completion timer is adjusted longer. If the harvest cycle does not end within 10 minutes, leave the machine running and unplug the thermistor. Check the resistance with your own meter and compare it against the temperature resistance chart in your tech specs book. For example, if your meter reads 6K ohms of resistance, the sensor temperature is 32 degrees. However, after 10 minutes in the harvest cycle, the temperature should be much warmer. This would tell you that there is a refrigeration problem. In another example, if your meter reads 2.5K ohms then the suction line temperature is 70 degrees. Since that temperature is well above the normal 48 degrees needed to start the defrost completion timer, the control board is not responding and there is a problem with the board. Once the harvest cycle ends, the freeze cycle begins. The hot gas valve and water valve de-energize and the pump motor and self-contained fan start. After the ice maker is in the freeze cycle, the evaporator inlet should feel cold within about 3 minutes. If it does, you have basic refrigeration occurring. If the evaporator is still warm after 3 minutes, there is a possible refrigeration problem. This problem might be caused by 1-hot gas valve not closing, 2- coil still energized because of a control board problem, 3- thermostatic expansion valve not opened properly, or 4- insufficient refrigerant. These items should be checked using normal refrigeration diagnostic practices. Next, let’s make sure the ice maker is purging properly by checking the pump-out system. After 5 minutes in the freeze cycle, unplug the float switch to initiate harvest. This will cause the unit to go into a 10 second pump-out that will flush the dirty water and sediment through the check valve and down the drain. You can also squeeze the pump supply hose tight enough to force the water down the drain. This would empty out the reservoir and allow the float switch to open by itself. It is important to understand the control components of the KM cuber. These components include the control board, the float switch, the thermistor, and bin control. First, let’s look at the bin control for any suspected problems or adjustments. A quick check of the bin control can be accomplished by switching the pump to the “wash” position. The unit will not start if the bin control is stuck open. When the bin control is stuck closed, the machine will not automatically shut off. If the bin control is not adjusted properly, it could cause the unit to shut down prematurely or allow ice to back up into the evaporator, causing a freeze-up condition. To check the adjustment of the bin control, access the thermostatic bulb, turn the switch to the “wash” position. Next, place a small amount of ice on the thermostatic bulb. Count the seconds and listen for the pump to shut off. If the pump shuts down within 6-10 seconds, the bin control is adjusted properly. Adjustment can be made with a screwdriver in the bin control slot. The float switch has two primary functions; it provides low water safety protections and initiates harvest. If the float sticks in the down position, which is open, the unit will switch to the one minute fill cycle and run water continuously. If the float sticks in the up position, which is closed, the unit will remain in freeze for 60 minutes. The cubes will be larger than normal and the pump will cavitate before harvest begins. If either of these symptoms exists, the float switch needs to be cleaned and checked. First, take the float switch apart and clean it with ice machine cleaner. Once you’ve cleaned the float switch, check it with an ohm meter to be sure it operates properly. The thermistor monitors the outlet temperature of the evaporator. At 48 degrees, it starts the defrost completion timer. At 127 degrees, it automatically shuts down the machine on the manual reset high-temperature safety. There are only two ways a thermistor can fail: open or shorted. An open thermistor will cause a consistent 20 minute harvest cycle. A shorted thermistor will shut the unit down on the high-temperature safety. When you switch the power off and back on, the safety will not reset. The thermistor should be checked using an ohm meter as previously discussed. Now, the control board. The control board processes information to supply the voltage that allows the components of the ice maker to cycle properly. Many things can affect the control board, but if you have proper supply voltage, proper control voltage, a good float switch, a good thermistor, and good pin connections, and the machine is not cycling properly, you can assume that you may have to replace the control board. Remember, when servicing any Hoshizaki ice maker, always refer to your tech specs guide for detailed information or call the Hoshizaki service hotline on your screen. Understanding these symptoms and the operation of these simple controls will help you diagnose sequence problems on a KM unit using the 10 minute check-out procedure.