For many, the word shortening refers specifically to hydrogenated vegetable fat, but technically, shortening can be used to identify any of the fats that are solid at room temperature and used in baking, including butter, lard, margarine, and vegetable fat. Lard was the most commonly used shortening until 1911 before the popular brand of all-vegetable shortening, Crisco, was created. After that, the brand became so popular that the words Crisco and shortening soon became synonymous. Today the word shortening describes any brand of hydrogenated, all-vegetable fat used in baking.
What is Vegetable Shortening?
Vegetable shortening is vegetable oil that has gone through the process of hydrogenation, which turns it into a solid. It's usually made from soybean, cottonseed, or palm oils. Shortening is white in color and has the consistency of soft butter. You can find it packaged in resealable canisters or baking sticks. Unlike butter, shortening won't impart any flavors to baked goods because it has a neutral taste.
One of the advantages of vegetable shortening is that it doesn't require refrigeration. Unopened, shortening may be stored in your pantry for up to two years without spoiling. Another benefit of vegetable shortening is that it can be used as an alternative to butter in vegan baking.
How Did Shortening Get its Name?
Shortening got its name because its purpose is to cause a shortening of the gluten fibers in dough. Wheat gluten forms elastic fibers and produces a dough that stretches, which is preferable for foods like pizza dough that need to be stretched and shaped. These types of doughs are called "long dough." When shortening is added to the mix, it breaks up the gluten fibers and creates a "short dough." Short dough produces a crumbly, flaky texture that is perfect for pie crusts. You'll often see pie crust called shortcrust for this reason.
When to Use Shortening
The most common use of shortening is to bake pie crusts. Because of its high melting point, shortening is easy to incorporate into the dough. It won't melt as you work the dough with your hands, as with butter. The high melting point also makes shortening a great choice for buttercreams that will hold their shape, even on a hot day. When used in place of butter, shortening produces cookies that are fluffy with a crumbly texture and cakes that are light and tender. The major disadvantage of shortening when compared to butter is the lack of flavor, but the benefits are stability, texture, and convenience.
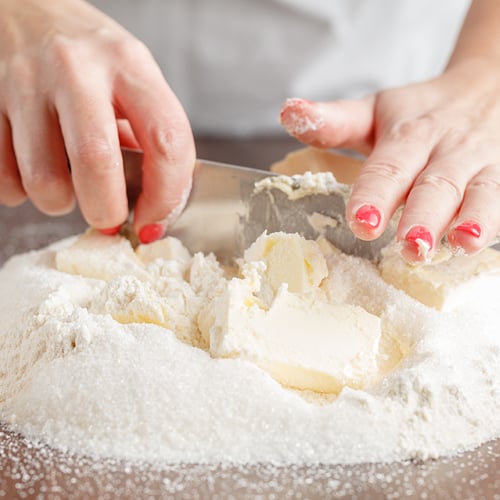
How to Cut In Shortening
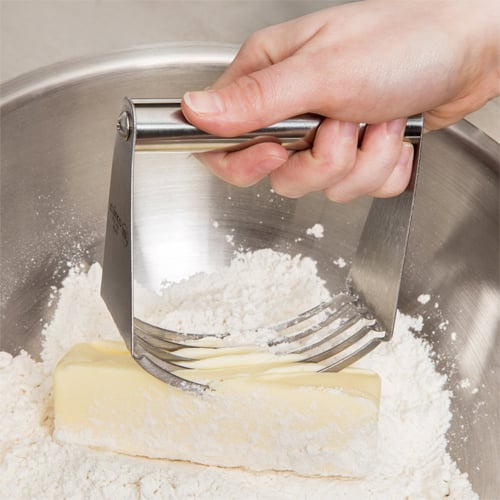
The method for adding shortening to your pastry dough is called cutting in. Instead of mixing, shortening is cut into the flour with the use of two knives or a pastry blender. To perform this method with two dinner knives, hold a knife in each hand and cross them over the shortening and flour. Pull the knives across each other to make slices in the mixture.
As you perform these cuts, the flour proteins become coated with shortening, and gluten formation is prevented. For most recipes, you will cut in the shortening until the mixture resembles particles the size of peas or small crumbs. This method is the best way to achieve a flaky pastry or pie crust.
Shortening Cutting Video
Use the following video to learn how to cut shortening:
Shortening Substitutes
Shortening can be substituted for other fats in your baking and vice versa.
Shortening vs Butter
Shortening and butter can be used interchangeably for most baking recipes with some slight adjustments. Because vegetable shortening is made of 100% fat, and butter contains water, it's not a one-to-one exchange. For every cup of shortening, you need to use 1 cup of butter plus 2 tablespoons. Pie crusts made with butter won't be as flaky as a crust made with shortening, but they will have rich, buttery flavor. For the best of both worlds, shortening and butter can be combined in your recipes.
Shortening vs Lard
Lard is made of 100% pork fat so it can be used as a one-to-one substitute for shortening when making pie crusts or other pastries. High-quality rendered lard from around the pig's kidneys has a neutral flavor just like shortening, but it also has the richness of butter. Use it to make tender, flaky crusts.
Shortening is especially useful in a commercial kitchen or bakery thanks to its long shelf life. Lard and butter may keep up to 6 months when refrigerated, but vegetable shortening can last up to two years before spoiling. It requires no refrigeration and can be purchased in bulk and placed in dry storage until needed.
Related Resources
What Is Beef Tallow?
Beef tallow is rendered beef fat, typically sourced from the suet surrounding the kidneys and loins of cattle. Once melted and purified, it transforms into a versatile, shelf-stable cooking fat prized for its umami flavor, cost-effectiveness, and high smoke point. From its traditional uses in frying and roasting to its modern applications in enhancing menu items and improving kitchen efficiency, beef tallow is a valuable ingredient for operators. Whether you're running a food truck, a fine dining establishment, or anything in between, beef tallow could be a game-changing ingredient for your business. Shop All Tallow Use these links to learn more about the various aspects of beef tallow: What Is Beef Tallow Used For? How to Make Beef Tallow How to Store Beef Tallow Beef Tallow vs Lard Beef Tallow FAQ What Is Beef Tallow Used For? Beef tallow is a powerhouse ingredient in the commercial kitchen, offering versatility and efficiency across several applications. Here are some of the most common ways operators utilize beef tallow to enhance their operations: Frying - With its high smoke point beef tallow is ideal for deep frying. It delivers perfectly crisp textures and a rich, savory flavor profile that enhances fried foods like donuts, french fries, chicken, and onion rings. Unlike many vegetable oils, tallow can be reused multiple times without degrading, making it a cost-effective choice for high-volume frying. Roasting and Searing - Chefs love using beef tallow to roast vegetables, sear proteins, and coat roasting pans. Its ability to add depth to the natural flavors of ingredients makes it a favorite for preparing everything from roasted potatoes to prime cuts of beef. Baking - In baking, beef tallow can replace fats like butter or shortening to create flakier pastries, richer pie crusts, and tender biscuits. Its neutral flavor and unique fat composition contribute to exceptional texture without overpowering other ingredients. Flavor Enhancement - Beef tallow can be used as a finishing fat to enhance the flavor of sauces, gravies, and even soups. Some operators drizzle it over dishes like steak or mashed potatoes for an extra layer of indulgence. Preservation and Food Prep - Historically used as a preservative, beef tallow can still play a role in modern kitchens by sealing and protecting prepared foods like pates or confit. Additionally, it’s an excellent choice for seasoning cast iron cookware, ensuring even heat distribution and a natural non-stick surface. How to Make Beef Tallow Video Watch the video below for a visual overview on how to make beef tallow: <iframe itemprop="https://www.youtube.com/embed/Kk7tVAWwN-U?si=jEDiUIf43ox45cKL" width="560" height="315" src="https://www.youtube.com/embed/Kk7tVAWwN-U?si=jEDiUIf43ox45cKL" frameborder="0" allowfullscreen></iframe> How to Make Beef Tallow For operators looking to control costs and enhance ingredient quality, rendering beef tallow in-house is a straightforward process that can deliver significant benefits. By converting raw beef suet into tallow, you gain access to a versatile cooking fat at an affordable price. Below we've outlined a step-by-step guide to making beef tallow on a commercial scale: Source Quality Fat: The quality of your beef tallow starts with the fat you use. Suet, the dense fat surrounding the kidneys and loins of cattle, is ideal for rendering due to its purity and high fat content. Many operators source suet directly from local butchers or meat suppliers to ensure freshness and reduce procurement costs. Prepare the Fat: Begin by trimming any remaining meat or connective tissue from the suet to prevent impurities from affecting the flavor or texture of the tallow. Cut the fat into small, uniform pieces, or use a meat grinder for faster, more consistent rendering. Melt the Fat: Place the prepared suet into a large, heavy-bottomed pot or commercial-grade rendering equipment. For dry rendering, heat the fat slowly over low heat. For optional wet rendering, add 1/4 to 1/2 cup of water and 1/2 teaspoon of kosher or sea salt per pound of fat to help draw out impurities. Maintain a gentle simmer over low heat for approximately 3 to 4 hours, depending on the quantity of fat. Stir occasionally to promote even melting and prevent sticking or scorching. As the fat renders, liquid tallow will separate from the solids. Strain and Purify: Once the fat has fully melted, remove it from the heat and allow it to rest for 5 to 10 minutes, allowing the remaining solids to settle. Carefully strain the hot liquid through a fine-mesh strainer, cheesecloth, or a commercial-grade filtration system to remove solid impurities. For wet rendering, strain the entire liquid mixture (tallow and water) together; the water will later separate and capture additional impurities. For dry rendering, strain only the liquid fat. Multiple filtration passes may be required to achieve a clear, clean tallow. For high-volume or commercial operations, automated filtration systems can improve efficiency and ensure consistent results. Cool and Store: Dry-rendered tallow may be used immediately or stored for later use. Allow the strained liquid to cool slightly before transferring it to storage containers. As it cools, the tallow will solidify into a creamy, off-white fat. When using the wet rendering method, allow the container to cool undisturbed until fully solidified; the tallow will form a solid layer on top of the water. Once firm, lift off the hardened tallow and scrape away any residual gelatin or impurities from the underside. If long-term storage is intended, the tallow may be gently reheated to drive off any remaining moisture before final packaging. How to Store Beef Tallow Proper storage of beef tallow is essential for maintaining its quality, extending its shelf life, and ensuring food safety in commercial kitchens. Whether you're storing small batches for daily use or large quantities for long-term supply, the right storage methods can help preserve its integrity and usability. Use Airtight Containers - Store beef tallow in airtight containers to prevent oxidation and contamination. Stainless steel canisters, glass jars, or food-grade storage containers with secure lids work best for keeping your tallow fresh. Keep Away from Heat and Light - You'll want to store your tallow in a cool, dark place to prevent the fat from degrading. Avoid placing containers near sources of heat and light like stoves, fryers, or direct sunlight. Label and Date Storage Containers - Clearly mark containers with the date of rendering or purchase to track freshness and stay on top of inventory. You'll also want to rotate stock using a first in, first out (FIFO) system to ensure the oldest tallow is used first. Prevent Cross-Contamination - Always use clean, dry utensils when handling tallow to avoid introducing moisture or bacteria. If you're considering using tallow for multiple applications such as frying and baking, consider storing separate batches to maintain flavor integrity. Does Beef Tallow Need to Be Refrigerated? Beef tallow does not strictly need to be refrigerated, but its storage method depends on how long you plan to keep it and how often you use it in your kitchen. While refrigeration isn’t always necessary, it’s a good practice for maintaining the quality and safety of beef tallow in kitchens, especially for long-term storage or irregular use. How Long Does Beef Tallow Last? Depending on the storage method, beef tallow can last anywhere from a few months to a few years. This extended shelf life helps reduce waste and secures a consistent supply for high-volume operations. Room Temperature - If stored in an airtight container away from heat and light, beef tallow can last up to 6 months at room temperature. This makes it a convenient option for kitchens that use it frequently in cooking or frying. Refrigeration - For longer shelf life, refrigerate your beef tallow. Properly sealed, it can last 12 months or more in the refrigerator without losing quality. Freezing - To maximize its longevity, freeze beef tallow in tightly sealed containers or vacuum-sealed bags. Frozen tallow can remain fresh for up to 2 years, making it an excellent option for large-scale storage in commercial operations. How to Tell If Beef Tallow Is Rancid Fresh beef tallow has a neutral, slightly meaty aroma, so if it smells sour, metallic, or otherwise unpleasant, it may have oxidized and gone bad. Rancid tallow may also develop a yellow or brown tint instead of the off-white or creamy color of fresh tallow. If the texture of your beef tallow feels sticky or overly grainy instead of smooth and solid, it could be a sign of spoilage. Rancid beef tallow will also have an unpleasantly bitter taste that indicates its gone bad. Beef Tallow vs Lard The main difference between beef tallow and lard is beef tallow is rendered fat from cattle, while lard is rendered fat from pigs, often sourced from back fat or kidney fat. While beef tallow has a rich, savory, beefy flavor that enhances fried foods, lard offers a more neutral taste with subtle pork undertones. Lard also has a lower smoke point than beef tallow, making it suitable for frying but less stable at very high temperatures. Both fats are cost-effective alternatives to vegetable oils, but beef tallow is better suited for savory, beef-focused dishes, while lard excels in applications requiring a more neutral fat. Beef Tallow vs Beef Fat Beef tallow is rendered and purified beef fat, free from impurities like connective tissue or meat remnants, while beef fat is raw fat trimmed directly from the beef. Beef fat often contains bits of meat or tissue and requires rendering to become usable as tallow. In terms of storage, beef tallow can be stored at room temperature or refrigerated for months, while beef fat is perishable and must be stored in the refrigerator or freezer until rendered. Using raw beef fat requires rendering, which can increase prep time and equipment usage. Opting for pre-rendered tallow saves time and helps guarantee consistency in your dishes. Beef Tallow FAQ Below we answer some of the most common questions regarding beef tallow: What Is Wet Rendering Tallow? Wet rendering is a method of making beef tallow by slowly heating fat with a small amount of water, often with added salt, to prevent scorching and help separate impurities. As the fat melts, the water absorbs proteins, blood, and other solids, resulting in a cleaner, lighter-colored tallow once cooled and separated. If you use salt, choose sea salt or another natural salt that does not contain iodine. If iodized salt is all you have on hand, it’s best to skip the salt altogether, since it will not separate with the water and impurities and can leave the finished tallow salty. The primary benefits of wet rendering are improved purity, reduced odor during processing, and a lower risk of burning. This method is especially well-suited for producing tallow intended for baking, soapmaking, candles, skincare products, or long-term storage. What Is Dry Rendering Tallow? Dry rendering is the process of melting beef fat using heat alone, without added water, allowing the fat to liquefy and separate directly from the solids. This method is faster and produces a tallow with a richer, beefier aroma and flavor. Dry rendering is preferred when making tallow for cooking, frying, or roasting, or when crispy cracklings are desired as a byproduct. However, it requires closer temperature control to avoid scorching or darkening the fat. What Is Wagyu Beef Tallow? Wagyu beef tallow is the rendered fat from Wagyu cattle, known for their high marbling and superior fat quality. Unlike regular beef tallow, Wagyu tallow has a softer texture, a lower melting point, and a more buttery mouthfeel due to its higher concentration of fats. While Wagyu tallow offers distinct advantages, it is more expensive than conventional beef tallow, making it best suited for restaurants and food businesses looking to offer a premium experience. Is Beef Tallow Expensive? Beef tallow is generally more cost-effective than many other cooking fats, particularly in high-volume commercial kitchens. However, the price can vary based on sourcing, quality, and whether it’s rendered in-house or purchased pre-rendered. Not only is beef tallow cost-effective, its long shelf life helps reduce waste costs and allows for it to be bought in bulk. Is Ghee Beef Tallow? No, ghee and beef tallow are not the same, though both are popular cooking fats with high smoke points and rich flavors. The key difference lies in their source and composition, as ghee is made from clarified butter, and beef tallow is made from rendered beef fat. Choose ghee for dishes that require a dairy-based richness, like curries, pastries, or sauteed vegetables, while beef tallow is better served for deep frying, searing meats, and adding a robust, beefy depth to dishes. Beef tallow is a versatile, cost-effective, and long-lasting cooking fat that offers significant benefits for commercial kitchens. Its high smoke point, rich flavor, and ability to be reused make it a smart choice for operators looking to optimize costs without compromising performance. By understanding how to store, use, and even render beef tallow in-house, businesses can take full advantage of this valuable ingredient, reducing waste and elevating their culinary offerings.

Best Oil for Frying Donuts
Donuts are the ultimate sweet indulgence, prized for their warm, pillowy texture and irresistible flavor. But many don’t realize that the type of oil you fry them in is just as important as the dough's ingredients when crafting the perfect donut. The right oil can significantly influence a donut’s taste, mouthfeel, and appearance. We’ve rounded up the five best oils for frying donuts, selected for their neutral or close-to-neutral taste, high smoke point, and affordability. Shop All Donut Frying Oils 1. Vegetable Shortening The oil of choice for many donut chains, including the famous Krispy Kreme, vegetable shortening is ideal for all donut types due to its versatility, neutral flavor, and cost-effectiveness. Typically made from soybean or a blend of vegetable oils, it gives donuts a light golden color, airy texture, and crisp exterior without altering the flavor. It comes in solid and liquid forms, with the solid variety offering better consistency and stability during frying. Shortening creates a firm texture with a tender crumb, achieving the perfect balance of crispy outside and soft inside. With a higher melting point than liquid oils, the donut absorbs less oil, resulting in a less greasy product. Its high smoke point also allows it to withstand the high temperatures needed for frying without breaking down or affecting flavor. Make sure to choose a vegetable shortening specifically made for frying since baking shortening has a much lower smoke point. Vegetable Shortening Smoke Point: 360 to 450 degrees Fahrenheit (182 to 232 Celsius) Vegetable Shortening Price Point: $ 2. Canola Oil Canola oil rivals vegetable shortening as the top choice for frying donuts and is a great alternative. Since it’s liquid at room temperature, it coats the donuts more evenly, resulting in a more delicate crust, tender crumb, and lighter golden color compared to shortening. The neutral taste ensures that the natural sweetness of the donuts shines through without being overshadowed by the oil itself. Canola oil is a healthier alternative, with lower levels of saturated fats and higher amounts of heart-healthy omega-3 fatty acids. While slightly more expensive than vegetable shortening, it remains a cost-effective option, especially if you’re looking for an oil to use across various menu segments. Versatile in its uses, canola oil is ideal for a wide range of culinary applications, including baking, salad dressings, deep frying, and grilling. Canola Oil Smoke Point: 400 degrees Fahrenheit (204 degrees Celsius) Canola Oil Price Point: $ 3. Palm Oil Palm oil is known for its stability, which is why it is the preferred choice for many commercial donut chains, including Dunkin' Donuts. It gives donuts a crisp, firm bite while yielding a soft center. It is generally inexpensive and is not derived from seeds, making it a cost-effective option to seed oils without sacrificing performance. It's important to note that palm oil production has significant environmental concerns, particularly concerning deforestation and habitat destruction. If eco-friendly practices are integral to your business model, prioritize sourcing palm oil from certified, ethically managed sources. Palm Oil Smoke Point: 450 degrees Fahrenheit (232 degrees Celsius) Palm Oil Price Point: $ 4. Cottonseed Oil Cottonseed oil is the preferred choice for frying beignets, a classic French donut. Its high smoke point and neutral flavor make it perfect for achieving the light, airy texture and crisp golden-brown exterior that defines a great beignet, and these same qualities make it equally effective for other types of donuts. Though it ranks in the middle in terms of affordability on our list, its exceptional stability and high smoke point allow it to be reused multiple times without sacrificing the quality of the food or the oil, making it a cost-effective option over time. Cottonseed Oil Smoke Point: 420 degrees Fahrenheit (216 degrees Celsius) Cottonseed Oil Price Point: $$ 5. Peanut Oil Refined peanut oil is made by pressing, filtering, and purifying raw peanuts, resulting in a light color and mildly nutty flavor that is versatile enough for all types of donuts. It works particularly well if you're planning to coat your donuts with crushed nuts or glaze them with peanut butter, as the subtle nutty taste complements these flavors. Its high smoke point makes it one of the best oils for deep frying foods, ensuring a consistent fry that results in a crisp exterior and soft, fluffy interior. While it’s the most expensive oil on this list, its price is justified by its high performance. Highly refined peanut oil is considered safe for most people with peanut allergies, as the protein that causes reactions is removed. However, if you choose to use this oil, your menu should clearly state that your items are fried in peanut oil to ensure customer safety. Peanut Oil Smoke Point: 450 degrees Fahrenheit (232 degrees Celsius) Peanut Oil Price Point: $$ What Oils Should You Avoid When Frying Donuts? When frying donuts, it's important to choose oils that can handle deep fryer temperatures without burning or imparting strong flavors. Therefore, it's best to avoid oils with a low smoke point or those with a strong, distinctive flavor. Here are some oils to avoid: Extra Virgin Olive Oil: While olive oil has health benefits, extra virgin olive oil has a relatively low smoke point, which makes it unsuitable for deep frying. Additionally, its rich, vegetal flavor will alter the taste of your donuts and isn’t the best pairing with sugary glazes and toppings. Unrefined Coconut Oil: Unrefined coconut oil has a smoke point of around 350 degrees Fahrenheit (175 degrees Celsius), which is at the low end for frying donuts and might not be enough. It also has a distinct coconut flavor that could overpower the flavor of the donuts. Opting for refined coconut oil can help mitigate its strong flavor while increasing its smoke point, but this is an expensive route to take so consider your clientele. Avocado Oil: Both refined and unrefined avocado oil have smoke points high enough to be used for deep frying, making them technically suitable for frying donuts. However, given the premium cost of avocado oil, it’s not the most cost-effective choice for bulk frying. The expense may outweigh any potential benefits, especially when there are more affordable oils that perform just as well in the fryer. When choosing an oil for your donut shop, let frying performance guide your decision. Most customers order donuts as a special treat rather than for health reasons, so it's best to prioritize flavor, smoke point, and cost when selecting your oil, rather than focusing solely on health aspects. To withstand the high temperatures required for deep frying, most oils must be refined to raise their smoke point, thus reducing their nutritional value. Can You Fry Donuts in Lard or Beef Tallow? Yes, lard and beef tallow have been used for centuries in donut frying, lending an old-fashioned taste. In fact, lard is the traditional frying medium to create authentic paczki and fastnacht. However, the cost is considerably higher to fry with animal fats than to use plant-derived oils. Lard has a smoke point of approximately 370 degrees Fahrenheit (188 degrees Celsius), while beef tallow boasts a smoke point of 400 degrees Fahrenheit (204 degrees Celsius). If you opt for lard or beef tallow, ensure they are properly rendered to maintain a neutral taste. It will also result in non-vegan or vegetarian donuts, which is something to keep in mind when choosing your target demographic. What Temperature Should You Fry Donuts At? The ideal temperature for frying donuts is between 350 and 375 degrees Fahrenheit (175 to 190 degrees Celsius). This temperature range ensures that the donuts cook quickly, becoming golden brown and crispy on the outside, while remaining soft and fluffy on the inside. It's important to maintain a consistent temperature throughout the frying process. If the oil is too hot, the donuts may brown too quickly on the outside while remaining raw inside. If the oil is too cool, the donuts will absorb more oil and become greasy. Using a thermometer to monitor the oil temperature can help ensure perfect frying results. How Long Should You Fry Donuts For? Donuts should typically be fried for 1 to 2 minutes on each side, depending on their size and thickness. The exact time may vary slightly, but you want the donuts to turn golden brown and crisp on the outside while remaining soft and fully cooked on the inside. Donut shops can ensure consistent product quality by opting for a neutral oil with a high smoke point to fry their donuts. Each oil on our list is an excellent option for creating one of America’s most beloved baked goods, offering both versatility and stability at high temperatures. These oils help achieve the perfect crispness and flavor without imparting any unwanted tastes or aromas, allowing your signature creations to shine.

Marzipan, Frangipane, Almond Paste, and Fondant: What’s the Difference?
In the world of baking and confectionary work, you will find several ingredients that are very similar to each other but serve very different purposes. Marzipan is one of those ingredients that often gets mistaken with another due to its consistency and make up. With names so similar, what is the difference between marzipan and frangipane? What about marzipan and almond paste or marzipan and fondant? We set out to clarify these differences and find out how all of these ingredients are properly used. Shop All Bakery Decorating Ingredients You can use the list below to navigate through the different sections: What is Marzipan? What is Fondant? Marzipan vs Fondant What is Frangipane? Marzipan vs Frangipane What is Almond Paste? Marzipan vs Almond Paste What is Marzipan? Marzipan, also known as almond candy dough, is a smooth and pliable confectionary paste made from almonds that can be used as a cake icing or molded into candies. It features a clay-like consistency that makes it easy to handle. This popular confection is often used in British baking recipes, but variations of marzipan can be found in French and German baking as well. Marzipan can be located in most international supermarkets, sold in a tub or plastic-wrapped log. How to Make Marzipan There are several marzipan recipes available with slight variation, but the basic marzipan ingredients include almonds, sugar, and a binding agent. Persipan is similar to marzipan but is made out of apricot or peach kernels instead of almonds, and is often used as a substitute in the event of nut allergies. Here are some common marzipan recipe options: Ground skinless almonds, powdered sugar, egg whites, and almond extract Almond paste, powdered sugar, and corn syrup Almond paste, sugar, water, and unbeaten egg whites Ground almonds, sugar, glucose syrup, water, and egg whites (optional) Blanched ground almonds, sugar, and starch or sorbitol This is just one recipe for homemade marzipan that you can follow: Cover 1/2 pound of almonds with boiling water Let it sit until cool Pinch each almond to slide the skin off Drain the skinless almonds of any excess liquid Place the almonds in a food processor Add 2 cups (16 oz) of powdered sugar over the almonds Run the processor until the mixture is smooth Scrape down the sides and run the processor for another minute Add 2 egg whites into the mixture Blend until the mixture develops a clay-like consistency Add a 1/2 teaspoon of almond extract and a 1/2 teaspoon of salt, plus any additional spices to enhance the flavor Remove the mixture from the bowl and use immediately or wrap in cling wrap and store in the refrigerator (the mixture can be stored for up to 2 weeks) The final result should produce a malleable speckled-white dough that is ready to use for all sorts of confectionary treats. How to Use Marzipan You can use marzipan in a variety of ways. It can be: Rolled out into a sheet and used as icing on cakes and cupcakes Added in cookie and biscuit recipes to make nutty marzipan cookies Sculpted into decoration such as fruits, animals, bows, etc. for cake decorations or marzipan candy Easily dyed and painted with edible paint because of the neutral marzipan color Used as the sweet center of chocolate covered marzipan candies What Does Marzipan Taste Like? Marzipan has a nutty flavor derived from the almonds in the mixture and can be very sweet. What is Fondant? Fondant is a smooth sugar paste that is popular in bakeries for cake decorating. There are a few different types of fondant as well. Rolled fondant is the more common type of fondant used in professional and amateur baking, however poured fondant can also be found in commercial settings. Fondant can often be found sold in pre-packaged tubs. How to Make Fondant The main ingredient used in a fondant recipe is confectioners sugar regardless of the variation of fondant you make. Rolled fondant is made by mixing powdered sugar, corn syrup, and shortening or vegetable oil until the mixture is firm and pliable. Gelatin is often added as well. Marshmallow fondant is made by melting mini marshmallows in the microwave with some water and then mixed with powdered sugar and vegetable shortening until the mixture is pliable. Poured fondant is made by boiling confectioners sugar, corn syrup, and water until it becomes opaque and creamy in consistency. How to Use Fondant Fondant is mostly used for baking decoration, however the two variations of fondant serve different purposes in the baking world. Rolled fondant and marshmallow fondant tend to be pliable and dough-like in texture. It can be: Dyed to form a variety of colored fondant Rolled out into sheets and layed over cakes as a smooth icing layer Molded into decorations as sculpting fondant for cakes and cupcakes Softened to form gum paste or sugar paste that hardens over time Poured fondant is creamy in consistency. It can be: Used as a filling for candies Drizzled over cakes and cookies for decoration What Does Fondant Taste Like? Fondant can be very sweet and sugary due to the high sugar levels, but provides a neutral taste for icing. Marzipan vs Fondant The similarities between marzipan and fondant are their texture and purpose. They are both malleable and can both be used interchangeably as a solid icing layer over cakes. They are easily dyed to create colorful and eye-catching decorations for cakes and cupcakes, and they are often used to make candies as well. For their differences, marzipan tends to be more pliable than fondant and is less likely to crack when being handled, making it easier to work with. Marzipan features a nutty subtle flavor that complements certain recipes while fondant is a more neutral sweeter alternative. Although fondant has a tendency to dry out when handled, it makes for an excellent substitute if nut allergies are a concern. What is Frangipane? Frangipane is an almond pastry cream that is used as a filling in a variety of pastries and cakes. It has a light and spreadable consistency. Frangipane can often be found as an ingredient in French baking and is typically associated with Christmas celebrations in France. Frangipane is generally sold in a powder form, requiring additional ingredients for its preparation. How to Make Frangipane A frangipane recipe mainly consists of ground almonds, butter, flour, sugar, and eggs. You can follow the steps below to make your own homemade frangipane filling: Add 3 tablespoons of softened butter and 1/4 cups of granulated sugar to a mixing bowl Cream the mixture together until soft Add the 1/2 cup ground skinless almonds to the mixture and blend Add 1 egg and 3/4 of a teaspoon of vanilla extract to the bowl and continue to mix until incorporated Add 1 tablespoon of all-purpose flour and blend into the mixture Place the mixture into a piping bag to begin filling your pastries The final result should produce a light tan cream that is enough for one large frangipane tart or several pastries. How to Use Frangipane Frangipane is used almost exclusively as a custard-like filling for pastries. Here are some pastries that incorporate frangipane into their recipes: Filled Croissants Bakewell Tarts Fruit Tarts Bostocks Jesuite Pastries Pithiviers What Does Frangipane Taste Like? Frangipane has a light sweetness to it and a nutty flavor due to the almonds. Marzipan vs Frangipane Marzipan and frangipane are only similar in the fact that they use almonds and have very similar-sounding names. Their purposes and textures, however, are very different, making them unable to be substituted with one another. While marzipan is a thick and sweet icing dough, frangipane is a creamy and lightly-sweetened filling. What is Almond Paste? Almond paste is a coarse dough-like paste made primarily out of almonds. It is predominately used as an ingredient in recipes for cakes and pastry fillings. You can find almond paste in various French pastry and candy recipes. Almond paste is usually sold in cans at local supermarkets. How to Make Almond Paste Almond paste is made from almonds, a small amount of sugar, oil, and occasionally, an egg. The recipes can vary and may be cooked depending on the added ingredients. Heavy cream or cornstarch can be used to substitute out the egg. You may follow the almond paste recipe below to make your own homemade almond paste: Place 1 pound of blanched almonds in a food processor Add 2 cups (16 oz) of powdered sugar sugar over the almonds Run the processor until the mixture is smooth Scrape down the sides and run the processor for another minute Add 3 egg whites into the mixture Blend until the mixture is fully incorporated Add 1 teaspoon of almond extract Remove the mixture from the bowl and use immediately or wrap in cling wrap and store in the refrigerator (the mixture can be stored for up to 1 week) The final result should produce a coarse beige dough that can be sliced or spread easily. How to Use Almond Paste Almond paste in usually added into recipes and not meant to be enjoyed on its own. It can be used as: A base ingredient for marzipan and frangipane recipes A filling for cakes, tarts, and cookies The center of various candies What Does Almond Paste Taste Like? Almond paste has a distinct almond flavor and is semi-bitter. It only has a mild sweetness since it is used as an additional ingredient in other recipes. Marzipan vs Almond Paste Marzipan and almond paste are easily confused with each other because they are made with the same basic ingredients: almonds, sugar, and some form of binding agent. However, the different ratios of these ingredients in each recipe is what sets these two confections apart. There is also some confusion around marzipan and almond pastes because, very often, marzipan and almond paste will be the same product in the United Kingdom while being different products in the United States, although it is not very common to find marzipan in North America. The ratio of almonds to sugar is the main factor for their differentiation. Almond paste has twice the amount of almonds in it compared to marzipan, making it coarser in texture and less sweet than its counterpart. Their consistency also differs as marzipan is smooth and pliable, almost clay-like, while almond paste is somewhat gritty and spreadable, almost like a cookie dough. Because of their differences, marzipan and almond paste should not be substituted for one another, however you can use almond paste to make marzipan by balancing out the ratio of sugar to almond. While marzipan can often be enjoyed on its own as a candy, almond paste will require a few extra ingredients to turn it into a delicious treat. Often times, it is subtle differences in a recipe that can transform a whole ingredient into another. By understanding the differences between marzipan, fondant, frangipane, and almond paste, you can increase your skill level as a baker and add a variety of delicious recipes into your repertoire.