Donuts are the ultimate sweet indulgence, prized for their warm, pillowy texture and irresistible flavor. But many don’t realize that the type of oil you fry them in is just as important as the dough's ingredients when crafting the perfect donut. The right oil can significantly influence a donut’s taste, mouthfeel, and appearance. We’ve rounded up the five best oils for frying donuts, selected for their neutral or close-to-neutral taste, high smoke point, and affordability.
Shop All Donut Frying Oils1. Vegetable Shortening
The oil of choice for many donut chains, including the famous Krispy Kreme, vegetable shortening is ideal for all donut types due to its versatility, neutral flavor, and cost-effectiveness. Typically made from soybean or a blend of vegetable oils, it gives donuts a light golden color, airy texture, and crisp exterior without altering the flavor. It comes in solid and liquid forms, with the solid variety offering better consistency and stability during frying.
Shortening creates a firm texture with a tender crumb, achieving the perfect balance of crispy outside and soft inside. With a higher melting point than liquid oils, the donut absorbs less oil, resulting in a less greasy product. Its high smoke point also allows it to withstand the high temperatures needed for frying without breaking down or affecting flavor. Make sure to choose a vegetable shortening specifically made for frying since baking shortening has a much lower smoke point.
- Vegetable Shortening Smoke Point: 360 to 450 degrees Fahrenheit (182 to 232 Celsius)
- Vegetable Shortening Price Point: $
2. Canola Oil
Canola oil rivals vegetable shortening as the top choice for frying donuts and is a great alternative. Since it’s liquid at room temperature, it coats the donuts more evenly, resulting in a more delicate crust, tender crumb, and lighter golden color compared to shortening. The neutral taste ensures that the natural sweetness of the donuts shines through without being overshadowed by the oil itself.
Canola oil is a healthier alternative, with lower levels of saturated fats and higher amounts of heart-healthy omega-3 fatty acids. While slightly more expensive than vegetable shortening, it remains a cost-effective option, especially if you’re looking for an oil to use across various menu segments. Versatile in its uses, canola oil is ideal for a wide range of culinary applications, including baking, salad dressings, deep frying, and grilling.
- Canola Oil Smoke Point: 400 degrees Fahrenheit (204 degrees Celsius)
- Canola Oil Price Point: $
3. Palm Oil
Palm oil is known for its stability, which is why it is the preferred choice for many commercial donut chains, including Dunkin' Donuts. It gives donuts a crisp, firm bite while yielding a soft center. It is generally inexpensive and is not derived from seeds, making it a cost-effective option to seed oils without sacrificing performance.
It's important to note that palm oil production has significant environmental concerns, particularly concerning deforestation and habitat destruction. If eco-friendly practices are integral to your business model, prioritize sourcing palm oil from certified, ethically managed sources.
- Palm Oil Smoke Point: 450 degrees Fahrenheit (232 degrees Celsius)
- Palm Oil Price Point: $
4. Cottonseed Oil
Cottonseed oil is the preferred choice for frying beignets, a classic French donut. Its high smoke point and neutral flavor make it perfect for achieving the light, airy texture and crisp golden-brown exterior that defines a great beignet, and these same qualities make it equally effective for other types of donuts.
Though it ranks in the middle in terms of affordability on our list, its exceptional stability and high smoke point allow it to be reused multiple times without sacrificing the quality of the food or the oil, making it a cost-effective option over time.
- Cottonseed Oil Smoke Point: 420 degrees Fahrenheit (216 degrees Celsius)
- Cottonseed Oil Price Point: $$
5. Peanut Oil
Refined peanut oil is made by pressing, filtering, and purifying raw peanuts, resulting in a light color and mildly nutty flavor that is versatile enough for all types of donuts. It works particularly well if you're planning to coat your donuts with crushed nuts or glaze them with peanut butter, as the subtle nutty taste complements these flavors. Its high smoke point makes it one of the best oils for deep frying foods, ensuring a consistent fry that results in a crisp exterior and soft, fluffy interior. While it’s the most expensive oil on this list, its price is justified by its high performance.
Highly refined peanut oil is considered safe for most people with peanut allergies, as the protein that causes reactions is removed. However, if you choose to use this oil, your menu should clearly state that your items are fried in peanut oil to ensure customer safety.
- Peanut Oil Smoke Point: 450 degrees Fahrenheit (232 degrees Celsius)
- Peanut Oil Price Point: $$
What Oils Should You Avoid When Frying Donuts?
When frying donuts, it's important to choose oils that can handle deep fryer temperatures without burning or imparting strong flavors. Therefore, it's best to avoid oils with a low smoke point or those with a strong, distinctive flavor. Here are some oils to avoid:
- Extra Virgin Olive Oil: While olive oil has health benefits, extra virgin olive oil has a relatively low smoke point, which makes it unsuitable for deep frying. Additionally, its rich, vegetal flavor will alter the taste of your donuts and isn’t the best pairing with sugary glazes and toppings.
- Unrefined Coconut Oil: Unrefined coconut oil has a smoke point of around 350 degrees Fahrenheit (175 degrees Celsius), which is at the low end for frying donuts and might not be enough. It also has a distinct coconut flavor that could overpower the flavor of the donuts. Opting for refined coconut oil can help mitigate its strong flavor while increasing its smoke point, but this is an expensive route to take so consider your clientele.
- Avocado Oil: Both refined and unrefined avocado oil have smoke points high enough to be used for deep frying, making them technically suitable for frying donuts. However, given the premium cost of avocado oil, it’s not the most cost-effective choice for bulk frying. The expense may outweigh any potential benefits, especially when there are more affordable oils that perform just as well in the fryer.
When choosing an oil for your donut shop, let frying performance guide your decision. Most customers order donuts as a special treat rather than for health reasons, so it's best to prioritize flavor, smoke point, and cost when selecting your oil, rather than focusing solely on health aspects. To withstand the high temperatures required for deep frying, most oils must be refined to raise their smoke point, thus reducing their nutritional value.
Can You Fry Donuts in Lard or Beef Tallow?
Yes, lard and beef tallow have been used for centuries in donut frying, lending an old-fashioned taste. In fact, lard is the traditional frying medium to create authentic paczki and fastnacht. However, the cost is considerably higher to fry with animal fats than to use plant-derived oils. Lard has a smoke point of approximately 370 degrees Fahrenheit (188 degrees Celsius), while beef tallow boasts a smoke point of 400 degrees Fahrenheit (204 degrees Celsius). If you opt for lard or beef tallow, ensure they are properly rendered to maintain a neutral taste. It will also result in non-vegan or vegetarian donuts, which is something to keep in mind when choosing your target demographic.
What Temperature Should You Fry Donuts At?
The ideal temperature for frying donuts is between 350 and 375 degrees Fahrenheit (175 to 190 degrees Celsius). This temperature range ensures that the donuts cook quickly, becoming golden brown and crispy on the outside, while remaining soft and fluffy on the inside. It's important to maintain a consistent temperature throughout the frying process. If the oil is too hot, the donuts may brown too quickly on the outside while remaining raw inside. If the oil is too cool, the donuts will absorb more oil and become greasy. Using a thermometer to monitor the oil temperature can help ensure perfect frying results.
How Long Should You Fry Donuts For?
Donuts should typically be fried for 1 to 2 minutes on each side, depending on their size and thickness. The exact time may vary slightly, but you want the donuts to turn golden brown and crisp on the outside while remaining soft and fully cooked on the inside.
Donut shops can ensure consistent product quality by opting for a neutral oil with a high smoke point to fry their donuts. Each oil on our list is an excellent option for creating one of America’s most beloved baked goods, offering both versatility and stability at high temperatures. These oils help achieve the perfect crispness and flavor without imparting any unwanted tastes or aromas, allowing your signature creations to shine.
Related Resources
12 Types of Frosting: The Definitive Guide
Before you can frost a cake, you must choose the frosting you’re going to work with. Essential for cakes and cupcakes but a welcome addition to cookies and other confections, frosting is both decadent and decorative. With so many options to choose from, it can be overwhelming to find the perfect frosting to pair with your bakery items. That's why we've crafted this comprehensive guide to the most popular types of frosting so you can decorate and enhance your baked goods with the ideal frosting flavor and consistency for each recipe. Shop All Frosting and Icing Use the following links to navigate and learn more about each type of frosting: Buttercream Frosting Swiss Meringue Buttercream Italian Meringue Buttercream French Buttercream German Buttercream Ermine Buttercream Cream Cheese Frosting Whipped Cream Frosting Seven Minute Frosting Ganache Fudge Frosting Fondant Types of Frosting Whether you’re looking to create a smooth finish on a cake or pipe buttercream roses for decoration, the type of frosting you use affects your baked goods' presentation. We’ll explore some common frosting types that you can use in your bakery. You can also find a printable frosting infographic below. Frosting vs Icing The difference between frosting and icing is that frosting is usually thick, creamy, and spreadable, while icing is typically thin, hardens when cooled, and is piped or drizzled on. Frostings are usually used to thickly coat or top different types of cakes and cupcakes, while icings are mostly used for decorations and for light sugary coatings on cookies and donuts. Both frosting and icing are staples in professional and home bakeries. <iframe scrolling="no" width="392" height="226" src="/v/?num=16282&width=600&height=500&embed=1" frameborder="0"></iframe> 1. Buttercream Frosting Buttercream frostings rely on the main ingredient of butter and will be the most common type of frosting you will find in a bakery. Plain buttercream is also referred to as American buttercream or simple buttercream frosting. Simple buttercream is considered a beaten butter frosting (which whips the butter first) as opposed to a cubed butter meringue frosting (which has butter chunks slowly added to the frosting). Flavor of Buttercream: Very sweet, probably the sweetest of the different types of buttercream Color of Buttercream: Ivory Texture of Buttercream: Thick and creamy; can become slightly grainy or greasy if improperly mixed; can develop thin crust over time Stiffness of Buttercream: Soft and pipable; can melt in warm settings and should be added to cooled sponges Uses of Buttercream: Pairs well with most cake sponge flavors, commonly used for sheet cakes and cupcakes Buttercream Recipe Difficulty: Easy; requires few tools and ingredients How to Make Buttercream Frosting To make buttercream frosting, you’ll need to combine a type of fat (typically butter or vegetable shortening) with a sweet base, usually powdered sugar (aka confectioners sugar or icing sugar). Beat room-temperature butter in a mixer until it is smooth. Mix sugar into the butter and whisk to form a smooth and airy consistency. Additional flavoring can be added at this time to tailor the frosting for your recipe. 2. Swiss Meringue Buttercream Swiss meringue buttercream is often just referred to as Swiss buttercream and is a cubed butter meringue frosting. This buttercream is subtle in flavor and easy to pipe, making it a great choice for more elegant bakes. Flavor of Swiss Meringue Buttercream: Mild buttery sweetness; can be easily flavored due to its subtle flavor Color of Swiss Meringue Buttercream: White Texture of Swiss Meringue Buttercream: Silky, smooth, and creamy; known for its airy texture Stiffness of Swiss Meringue Buttercream: Soft, may start to develop bubbles if left out but can be fixed by re-mixing; will melt in warm settings Uses of Swiss Meringue Buttercream: Frosting used for wedding cakes to achieve a perfectly white coating Swiss Meringue Buttercream Recipe Difficulty: Medium; requires the use of a stove, mixer, and candy thermometer; it can curdle or separate if made incorrectly How to Make Swiss Meringue Buttercream To make Swiss buttercream, you’ll want to separate egg whites to form the meringue base. Make sure the eggs are at room temperature and that no yolks end up in the mixture. Yolks may impact its ability to fluff up. Always make sure your mixing bowl and whisk are completely clean before you start. Whisk together the egg whites and sugar. Cook the sugar and egg mixture in a double boiler (aka bain marie) and whisk it until the mixture reaches 160 degrees Fahrenheit or until all of the sugar granules have dissolved. Whisk the cooked mixture in your mixer until you achieve stiff peaks and it is room temperature. Once the meringue is cooled, add room-temperature butter, one tablespoon at a time while mixing. Keep mixing until you achieve stiff peaks again. Add flavoring and gently mix to incorporate. 3. Italian Meringue Buttercream Italian meringue buttercream or Italian buttercream is a cubed butter meringue frosting. It is a staple in the cake-baking industry because it is less prone to melting in warmer climates. The taste and texture make it a go-to option for bakers catering upscale events. Flavor of Italian Buttercream: Mild buttery sweetness; can be easily flavored to complement your sponge Color of Italian Buttercream: White Texture of Italian Buttercream: Creamy, smooth, and silky Stiffness of Italian Buttercream: Highly stable; will hold up relatively well in warmer conditions Uses of Italian Buttercream: Smooth finish is perfect for decorating birthday cakes, wedding cakes, and pies, especially for outdoor events Italian Buttercream Recipe Difficulty: Hard; considered to be the most difficult of the meringue buttercreams because of its need for accurate measurements, temperatures, and mixing speeds How to Make Italian Meringue Buttercream To make Italian buttercream, you will need a range top, a mixer, and a candy thermometer. This recipe uses room-temperature egg whites only, so you’ll want to separate out the yolks. Check to make sure your mixing bowl and whisk are clean before starting. Add egg whites, cream of tartar, and a pinch of salt to a mixing bowl and start the mixer on low, gradually increasing to medium speed. Slowly add sugar to the meringue and mix until soft peaks are achieved. In the meantime, heat sugar and water on medium-high heat until the candy thermometer reaches between 235 and 240 degrees Fahrenheit. Bring your mixer to a slow speed and slowly drizzle in the sugar syrup. Once the syrup is in, increase the mixer speed until you achieve soft peaks. Turn off the mixer and allow the meringue to reach room temperature (you can place ice packs around the bowl to speed up the process). Once at room temperature, bring the mixer to a slow speed and add a tablespoon of butter at a time, mixing until you achieve stiff peaks. Add your flavoring and gently mix to incorporate. Back to Top 4. French Buttercream French buttercream is a cubed butter frosting and the richest of the buttercreams. Unlike Swiss and Italian buttercreams, it is not a true meringue because it uses egg yolks rather than egg whites. While their names are similar, French buttercream and French meringue buttercream are not the same kind of frosting. French meringue buttercream is made with uncooked egg whites, sugar, and butter. Because the egg whites do not get cooked in the process, it is considered unsafe to consume unless you are planning to cook the final product or use pasteurized eggs. The details below are for French buttercream and not French meringue buttercream. Flavor of French Buttercream: Rich and buttery; similar in flavor to custard, but mildly sweet Color of French Buttercream: Yellow Texture of French Buttercream: Creamy, thick, and silky Stiffness of French Buttercream: Soft, does not hold its shape very well, and will melt in warm conditions Uses of French Buttercream: Because of its soft consistency, this frosting is mainly used for fillings, cupcake frosting, and the base for fruit tarts French Buttercream Recipe Difficulty: Hard; sugar temperature needs to be monitored so it doesn't get too hot and crystalize How to Make French Buttercream When making French buttercream, you’ll want to use room-temperature egg yolks rather than egg whites. You will need a range top, candy thermometer, and mixer to combine the ingredients. Make the sugar syrup by combining the sugar with some water and heat it in a pan until it hits 240 degrees Fahrenheit. Mix the egg yolks and a pinch of salt on a medium speed. Switch the mixer to a low speed and slowly drizzle the sugar syrup into the bowl. Increase the mixer speed to medium and whisk until the mixture is at room temperature. Add room-temperature butter to the bowl, one tablespoon at a time, while mixing. Finish by adding flavoring. 5. German Buttercream German buttercream is a beaten butter frosting and can also be referred to as custard buttercream or pastry-cream butter. The unique recipe is rare in the bakery scene but can be a great change of pace over a traditional buttercream. Flavor of German Buttercream: Slightly rich and custard-like, almost ice cream-like flavor Color of German Buttercream: Pale Yellow Texture of German Buttercream: Creamy, airy, and smooth Stiffness of German Buttercream: Soft and pipable; not very stable; will melt in warmer conditions Uses of German Buttercream: Cupcake frosting or a filling for pastries, but not a great choice for decorations German Buttercream Recipe Difficulty: Medium; a custard will need to be made before the frosting can come together How to Make German Buttercream To make German buttercream, you will first need to make the rich pastry cream or custard that serves as the base of the frosting. This recipe uses whole eggs, unlike most buttercream recipes which usually just use the whites or yolks. Using a saucepan, start by heating milk to a simmer over medium heat and steeping any additional flavors you are looking to add. Whisk the cornstarch (or flour), sugar, and room-temperature eggs on medium speed in a mixer. Slowly add half of the simmered milk into the egg mixture while whisking. Transfer the egg mixture into the saucepan with the remaining milk over medium-low heat and bring the mixture to a boil as you whisk. Turn the heat to low and whisk for approximately 2 more minutes. Transfer the custard to a shallow pan and spread it out to cool. In a separate bowl, beat butter on a medium-high speed until fluffy. Add one tablespoon at a time of custard to the whipped butter while the mixer is running until it is fully incorporated. 6. Ermine Buttercream Ermine buttercream is commonly referred to as flour buttercream, cooked frosting, or boiled milk icing. It is a beaten butter frosting that most consumers are not aware of but is usually found in pre-packaged supermarket pastries. Ermine frosting usually serves as an eggless alternative to Swiss meringue buttercream. Flavor of Ermine Buttercream: Mild sweetness; can be flavored to complement the sponge Color of Ermine Buttercream: Ivory Texture of Ermine Buttercream: Airy, creamy, and silky Stiffness of Ermine Buttercream: Very soft and pipeable; will melt in warmer conditions Uses of Ermine Buttercream: A great frosting for cakes and cupcakes but will not hold up well for decorations; often used to frost red-velvet cakes and to fill Ding Dongs and Twinkies Ermine Buttercream Recipe Difficulty: Medium; requires a range top and a variety of ingredients How to Make Ermine Buttercream Ermine buttercream requires some cooking before the buttercream can come together, earning it the name cooked frosting. You will need a saucepan, range top, and mixer to prepare this frosting. Add flour and sugar to a saucepan and whisk over medium heat for about 2 minutes. While whisking, slowly add the milk, pouring a little at a time. Once all of the milk is added, bring the mixture to medium-high heat and whisk until it thickens to a pudding-like consistency. Pour the mixture into a mixing bowl and cover it with plastic wrap so that the wrap is touching the surface of the mixture. Set aside to cool. Place room-temperature butter in the bowl of your mixer and whisk on high until fluffy. Slowly add the cooled mixture to the butter, one tablespoon at a time. Add your flavoring and mix on low to incorporate. Back to Top 7. Cream Cheese Frosting Cream cheese frosting falls under the beaten butter buttercream frosting category, but with a twist - it replaces a significant portion of the butter with rich and creamy cream cheese. The unique combination of cream cheese and butter creates a velvety texture that spreads smoothly over cakes, cupcakes, and cookies. The cream cheese adds a tangy note that balances out the sweetness. It is the classic frosting for carrot cake, red velvet cake, and frosted cinnamon rolls. Flavor of Cream Cheese Frosting: Tangy and sweet Color of Cream Cheese Frosting: White Texture of Cream Cheese Frosting: Smooth and creamy Stiffness of Cream Cheese Frosting: Pipable and soft; can begin to melt and become runny in warmer conditions; frosting should be refrigerated when not in use Uses of Cream Cheese Frosting: Usually paired with moist sponges like red velvet cupcakes, carrot cake, and hummingbird cake Cream Cheese Frosting Recipe Difficulty: Easy; requires few ingredients and supplies How to Make Cream Cheese Frosting Similar to American buttercream, cream cheese frosting is made with a fat and a sweet base. A mixer or bowl and whisk are typically the only equipment needed to make this frosting. On a medium speed, mix together room-temperature full-fat brick-style cream cheese and butter until the mixture is well combined and clump-free. Add in vanilla extract and salt and continue mixing. On a low speed, slowly add the powdered sugar until it is fully incorporated. 8. Whipped Cream Frosting Whipped cream frosting, also known as Chantilly cream frosting, is beloved for its fluffy and airy consistency. Made from heavy cream that is whipped to perfection, this frosting creates a light and delicate layer that melts in your mouth. It’s typically prepared right before serving, ensuring its freshness and light texture. It is particularly well-suited for pairing with fruity flavors, as its creamy sweetness beautifully complements the natural tartness and juiciness of fruits. Flavor of Whipped Cream Frosting: Light and mild flavor Color of Whipped Cream Frosting: Ivory to Pale Yellow Texture of Whipped Cream Frosting: Airy and fluffy Stiffness of Whipped Cream Frosting: Very soft and prone to collapsing; will lose consistency over time and should be used right away or refrigerated Uses of Whipped Cream Frosting: Great frosting for topping summer cakes like strawberry shortcakes and berry cakes Whipped Cream Frosting Recipe Difficulty: Medium; the mixture requires attention since it is prone to over-mixing and curdling How to Make Whipped Cream Frosting To make whipped cream frosting, you use a whipped cream recipe and add mascarpone to firm it up and make it stable enough for frosting a baked good. The powdered sugar has cornstarch in it, which is essential for stabilizing the whipped cream. Whipped together heavy whipping cream and powdered sugar, starting your mixer on a low speed and covering the bowl with a dish towel to prevent a powdered sugar cloud. Be sure to keep a close eye on the mixture as it whisks together or it can overmix and curdle. Mix for approximately 4 minutes or until the mixture is light and fluffy. Add in your flavoring, such as vanilla extract, and mix for just a few seconds. At this phase, you will have a light whipped cream that can be used as is. To create a stable frosting, spread creamy mascarpone cheese in a separate bowl to smooth it out and remove lumps. Add the smooth mascarpone cheese to the whipped cream and give it a few mixes on low. Finish by folding the frosting by hand until uniform. 9. Seven Minute Frosting Seven minute frosting derives its moniker from the length of time it requires to make it. It offers a melt-in-your-mouth texture and delicate sweetness. Its subtle flavor complements a wide range of desserts without overpowering their inherent flavors. With just a handful of ingredients, including sugar, egg whites, and cream of tartar, this simple recipe transforms into a luscious, cloud-like topping that can elevate any dessert. Flavor of Seven Minute Frosting: Sweet and marshmallow-like Color of Seven Minute Frosting: White Texture of Seven Minute Frosting: Fluffy, light, and airy; provides a melt-in-your-mouth experience Stiffness of Seven Minute Frosting: Starts off soft but can harden the longer it sits out, developing a crust over time; may start to absorb into the sponge if not eaten the same day Uses of Seven Minute Frosting: Can be dolloped on cupcakes or rippled over cakes for a fluffy look and pure white finish, often paired with shaved coconut Seven Minute Frosting Recipe Difficulty: Medium; you will need a double boiler and must monitor the mixing process How to Make Seven Minute Frosting To make seven minute frosting, you’ll need to cook the ingredients in a double boiler then allow it to mix and cool for approximately seven minutes (give or take). Mix your sugar and cream of tartar together to evenly distribute the ingredients. Add the sugar, cream of tartar, egg whites, and water to a mixing bowl and whisk together. Place your bowl on a double boiler and whisk periodically until the mixture looks frothy. Beat the mixture on a stand mixer or with a hand mixer for approximately 7 minutes until you achieve stiff peaks. Back to Top 10. Ganache Ganache is a cross between frosting and icing, and it is very versatile for coating different pastries and desserts. Composed of just chocolate and a hot liquid, it's perfect for dipping fruits and hearty types of donuts into, or drizzling over pies and cakes. If you chill ganache, you can make chocolate truffles as a bite-sized dessert option. Flavor of Ganache: Rich and chocolatey Color of Ganache: Glossy Dark Brown Texture of Ganache: Creamy, silky, and thick Stiffness of Ganache: Liquidy and pourable; does not stiffen unless chilled Uses of Ganache: Topping on cheesecakes, eclairs, and cupcakes; filling for pastries and cakes Ganache Recipe Difficulty: Easy; only requires 2 ingredients How to Make Ganache Chocolate ganache can be made with any hot liquid (cream, coffee, etc.) combined with dark, milk, or white chocolate. The consistency can also be impacted by the amount of liquid added. Chop up chocolate chips or chocolate bars and place them in a heat-safe bowl. In a separate pan, heat heavy cream or heavy whipping cream on medium heat until it is scalding (just under boiling). Pour the cream onto the chocolate and allow it to sit for 1-2 minutes. Whisk the mixture until the ganache thickens and is fully incorporated. *To create a frosting out of ganache, simply whip the finished product on high for about 4 minutes to achieve a fluffy and pipable consistency. 11. Fudge Frosting Fudge frosting is an indulgent frosting for those who love chocolate. Its smooth and velvety texture is achieved by combining high-quality cocoa powder, butter, and powdered sugar. The result is a glossy and irresistible frosting that adds a luxurious touch to any baked creation. Due to its richness, it is often paired with plain sponges or tart desserts to create a harmonious balance. Flavor of Fudge Frosting: Decadent, sweet, and chocolatey Color of Fudge Frosting: Light Brown to Brown Texture of Fudge Frosting: Creamy and smooth Stiffness of Fudge Frosting: Pipeable; soft and spreadable; may stiffen up over time to a fudge-like consistency Uses of Fudge Frosting: Spread over yellow cake or piped onto cupcakes; because of its sweetness, it is best paired with mildly flavored sponges Ganache Recipe Fudge Frosting: Easy; requires few ingredients and supplies How to Make Fudge Frosting There are a few ways to make fudge frosting. Some bakers choose to use cocoa powder while others use chocolate bars. You may microwave your ingredients or cook them on a stove. The instructions below are for frostings made with cocoa powder and cooked on a range top. On low heat, melt butter and then slowly mix in the cocoa powder. Once the mixture resembles a paste, transfer it to a large mixing bowl. On a low speed, mix in powdered sugar and milk, alternating between the two. Add the vanilla and mix on medium-high for about 5 minutes until smooth and creamy. 12. Fondant Fondant icing is a sugar paste and a classic choice for decorating cakes because it provides a smooth and professional look. There are three types of fondant: rolled fondant, marshmallow fondant, and poured fondant. They are all used for coating sponges and pastries but will provide slightly different results. We will be focusing on rolled fondant below. Flavor of Fondant: Sugary and sweet; can be flavored in the cooking process Color of Fondant: White; can be easily colored Texture of Fondant: Smooth and marshmallow-like consistency; slightly chewy Stiffness of Fondant: Stiff and malleable, can be rolled out into sheets and shaped Uses of Fondant: Creates a clean and smooth cover on cakes; molded and cut into shapes for cake decorations Fondant Recipe Difficulty: Hard; requires a variety of ingredients, equipment, and physical effort How to Make Fondant To make rolled fondant, you’ll need to combine powdered sugar, corn syrup, and a shortening to create a pliable paste or sheet for your cakes. Add clear unflavored gelatin to cold water and allow to sit until thick. Mix the gelatin and heat the mixture in a double boiler until dissolved. Add glucose syrup or corn syrup and glycerin to the mixture and stir until fully incorporated. Slowly stir in the shortening and remove from heat before it melts completely. Add in the vanilla or additional flavoring and allow to cool until the mixture is lukewarm. Place half of the icing sugar in a bowl. Create a well in the center and drop in the mixture. Stir the mixture with a wooden spoon until most of the sugar is incorporated and add the rest of the sugar in until the mixture is no longer sticky. Sprinkle some powdered sugar on a clean surface and dump the fondant onto the sugar. Knead the fondant until it is smooth and pliable. Add more sugar if it is too soft or wet. Back to Top Types of Frosting with Pictures Check out our visual guide to the different types of frosting with pictures. This helpful infographic makes identifying and applying the best frosting for your baked goods easy. Printable Version Regardless of the type of bakery you own, you’ll find that frosting is an essential part of your business. Use this guide to find the right frostings for your recipes, and make a great impression on your customers.
Commercial Bakery Equipment List
Finding the best bakery equipment can be daunting, whether you've owned a bakery for years or are just starting in the industry. It represents a significant investment, and you’ll want to get the most for your money. Before purchasing, consider your menu, expected output, and preferred baking styles. To help guide you through the purchasing process, we’ve provided a list of essential bakery equipment and a downloadable checklist below: Download Checklist PDF Click any of the tips below to skip to the bakery equipment that interests you: Dough Prep Equipment Baking Equipment Display Equipment Dough Prep Equipment Dough preparation is the cornerstone of creating delicious baked goods, and having the right equipment is a key factor for achieving the perfect texture and quality in your signature products. While small, artisan-style bakeries may opt for hand mixing, most commercial bakeries invest in commercial dough prep equipment to enhance output and consistency. To streamline your dough preparation process and achieve optimal results, there are several key appliances that you should consider investing in. Commercial Mixers Commercial mixers, sometimes called planetary mixers, can mix batters, whip eggs, knead dough, and complete a wide range of other kitchen tasks. They come in a variety of sizes, ranging from 5 qt. countertop models up to 100+ qt. floor units. Depending on your needs, you can choose from mixers with different styles, lift types, and speeds. Mid to large-size bakeries may choose to have several floor units, while smaller operations might benefit from a countertop unit's portable nature, which will lend itself to mixing up small batches of icing or fillings quickly and easily. Best for: General mixing tasks Dough Dividers and Sheeters Dough dividers are specialized pieces of commercial bakery equipment that take a large batch of dough and portion it into equally sized and weighted balls. They ensure consistent results when making pies, bread, or pizza crusts. Dough sheeters take that ball of dough, roll it, and stretch it to the size and thickness you desire. These types of equipment can be bulky and expensive, and while they can be great labor cost savers for high-volume establishments, they may not be the best investment for smaller, independent bakeries. Best for: High-volume dough prep Holding and Proofing Cabinets Because dough rises best in warm, humid environments, holding and proofing cabinets are excellent investments. These specialized units achieve the perfect temperature and humidity levels for consistent, repeatable dough. They come in many styles and sizes, giving you options. You can purchase cabinets that are strictly designed for proofing or models that also boast a hot holding function. If you're short on space, consider buying combination holding and proofing cabinets, which give you the versatility of two pieces of equipment in a single footprint. Best for: High-volume dough prep Retarders and Proofers If you wish to slow down the rising of your dough, you can refrigerate it. But, some types of dough turn out best when they're allowed to rest at higher temperatures. In this case, you may want to consider a retarder. The most versatile retarders are combination units that will switch over to proofing the dough when you're ready to do so. You can put your dough in overnight, program the machine to start proofing them at a certain time, and have them proofed and ready for baking exactly when you're ready. Some specialized models even combine the retarder/proofer and convection oven capabilities into one unit. Best for: Controlling the rise of dough Baking Equipment The heart of any bakery is its oven. They come in many shapes, sizes, and styles, allowing you to identify which model best fits the needs of your establishment. Consider what kinds of baked goods you plan to offer, the quantity you expect to sell, and the space in your kitchen when looking for an oven. Remember that no matter what oven you install, you'll almost always need to keep it under a ventilation hood. Convection Ovens Convection ovens are one of the most common pieces of commercial bakery equipment. They do a great job of quickly baking, using internal fans to circulate the air and create even browning. Of the ovens typically used in a bakery, a convection oven is the most common and least expensive. Some high-end types of convection ovens boast steam injection and other specialized features that can take your baked goods to the next level. Best for: Traditional baking tasks, small- and medium-sized bakeries Deck Ovens Artisan-style bakers or those making specific types of bread prefer a deck oven. Their stone cooking decks heat up, giving the crust a distinctive, crispy texture while maintaining a soft and moist inside. A deck oven takes up considerably more space than a convection oven, so keep that in mind if space is limited. However, due to their relatively simple design and few moving parts, they last a long time and operate without a lot of hassle. Both single-deck and multi-deck styles are available. Best for: Artisan baking Roll-In Rack Ovens A roll-in rack oven is similar in concept to a roll-in refrigerator or proofing cabinet, allowing you to wheel a pan rack full of goods into the oven for baking. Some models will grab the pan rack and rotate them during baking for even results. Because of their convenient design, these ovens are perfect for baking large quantities of goods while saving your staff time in the kitchen. They are especially popular in high-output bakeries. Best for: High-output baking, time saving Revolving Ovens A revolving oven has large revolving trays that you can load, similar in concept to a rotisserie-style oven at a deli or market. They are perfect for preparing bagels, pizza dough, and certain types of bread. These ovens have a very high capacity and output capability but are also expensive. Because of their high price tag, you should make sure your output needs and budget can justify the investment before making a purchase. Best for: High-output baking Display Equipment A key part of any successful bakery is how you display and market your signature goods. Investing in the right display and sales equipment can set your business up for success, attracting customers and increasing impulse sales. Remember that different bakery concepts lend themselves to various displays, and you should always invest in the equipment that best fits your needs. Bread Slicers Due to their speed and consistency of cut, bread slicers are a great option if your bakery plans to sell sliced bread. Some specialized models accommodate unique baked goods such as French bread, buns, and bagels, giving you versatility in your slicing needs. These slicers come in countertop and floor varieties, allowing you to choose the one that best fits your bakery layout and production volume. Additionally, bread slicers can be purchased for a wide range of slice sizes, ensuring you can offer your customers the perfect thickness of bread slices for their preferences. Best for: Bread bakeries Bakery Display Cases If you have plans for a large retail component in your bakery, you'll want to consider what types of bakery display cases you will need. Both refrigerated and non-refrigerated styles are available, depending on the type of products you plan on selling. Likely, you'll want a mix of both. You will also have to decide whether you want a self-serve display case or one designed for serving customers from behind the counter. Best for: Most commercial bakeries Back to Top Finding the best commercial bakery equipment is just one step in starting a business. In addition to heavy equipment, be sure to stock up on tools like bread knives and other smallwares. By investing in the right equipment and supplies, you can position your business for success.
How to Ship Baked Goods
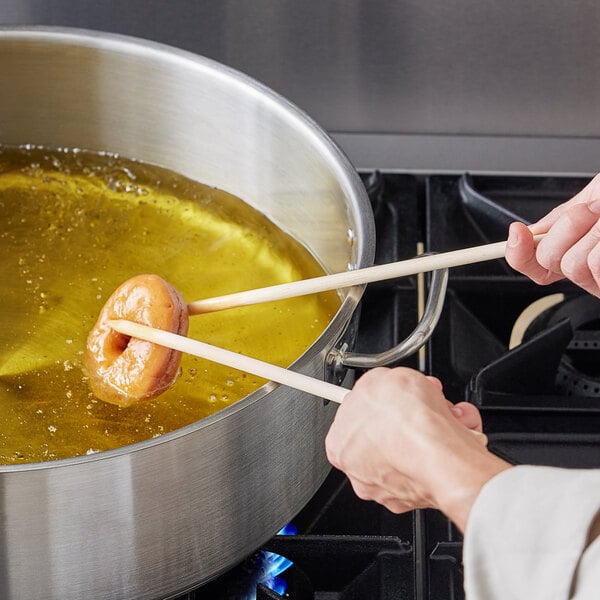
If you develop a reliable shipping strategy, selling baked goods online can broaden your customer base or allow you to forgo a storefront. Mailing delicate, perishable pastries requires extreme care. Whichever type of bakery you operate, use our bakery shipping guide to ensure your customers receive fresh, safe-to-consume, and intact baked goods. Click below to dive into the bakery shipping information that interests you: How to Ship Cookies Bakery Shipping Strategy How to Ship Macarons How to Ship Bread How to Ship Banana Bread How to Ship Cake How to Ship Cupcakes How to Ship Pie How to Ship Brownies Bakery Shipping FAQ How to Ship Cookies <iframe itemprop="embedURL" width="560" height="315" src="https://www.youtube.com/embed/7z34J5Owmv8?rel=0" frameborder="0" allowfullscreen></iframe> How to Ship Cookies without Breaking Given their hearty nature, cookies are one of the best baked goods to ship. They transport so well, ghost kitchen entrepreneurs have created entire concepts around cookies. Household name Mariah Carey even has a virtual brand, Mariah's Cookies. However, some cookies ship better than others. Cookies with eggs in their recipe are sturdier than their eggless counterparts (ex. shortbread cookies), making them better candidates for shipping orders. We explain the ins and outs of how to ship cookies below. How to Package Cookies for Shipping Wrap the cookies. If you’re shipping multiple types of cookies in one order, individually wrap each cookie in a sealed bag to prevent flavor diffusion. If you’re shipping cookies of the same flavor, you can arrange them back-to-back and loosely wrap them in plastic wrap. Secure the cookies. Fill the nooks and crannies in your box with packing supplies. Otherwise, your cookies will jostle and break in transit. Shake test your box. Give your box a shake to make sure the cookies aren’t slipping around before shipping them. Don’t skimp on the packing materials. The expense of the packing materials is nothing compared to losing a customer because their cookies arrived as a pile of crumbs. Use a shallow, flat container. Don't stack the cookie layers higher than two layers deep. Ship smaller cookies. Smaller cookies are less likely to crumble than larger cookies. Use a teaspoon rather than a 2" cookie scoop to make cookies for shipment orders. If customers are used to receiving giant cookies when they buy them on your bakery's premises, consider shipping multiple small cookies for the price of one large storefront cookie. How to Ship Decorated Cookies To prevent your cookies from crumbling in transit, use a food tin or box to protect them inside their shipping box. Start by creating a cushion layer of crumpled wax paper on the bottom of the cookie tin. Then add your wrapped cookies to the tin and top them with another cushioning layer of crumpled wax paper. These extra protections are especially helpful for shipping fragile and decorated cookies. Should I Freeze Cookies before Mailing? Freezing cookies before mailing them is an excellent way to protect them and help them stay fresh. Frozen cookies are more solid and less likely to break in transit. You can ship frozen cookies in their plastic packaging, saving you money on insulated shipping containers. Most cookies freeze and defrost without altering their flavor or consistency. You can arrange your cooled cookies on a plate as you’d like to present them, wrap the plate in plastic, and freeze them together. Once frozen, your plate of cookies is ready for packaging. Typically, the moisture the cookies release as they defrost isn’t enough to make their package leak. However, since leaks go against USPS rules, it’s advisable to use water-soluble packaging materials. How to Send Baked Goods in the Mail If you’re sending sturdy baked goods locally, you can put pastries in priority mail. However, overnight shipping is the ideal way to send baked goods to preserve their quality. For fragile or temperature-sensitive items like cheesecakes, overnight shipping isn't just beneficial, it's required. Whether you’re packaging your goodies for the mail or shipment, follow our step-by-step instructions for shipping or mailing baked goods. 1. Package Your Baked Goods for Shipping The ideal packaging for baked goods varies by the type of sweet treat you’re shipping. No matter what, you must secure them inside their shipping container. There is nothing more disappointing than receiving a crumbled pastry mess in the mail. We provide some bakery shipping tips that will help preserve the structural integrity of your sweets. How to Package Baked Goods for Shipping Follow these general guidelines to package baked goods for shipping and upgrade your small business shipping services: Cool baked goods before packing them. You should only package cooled baked goods to prevent moisture build-up. Secure each item. Use food-grade bags, parchment paper, or food liners to help keep them intact. Individual wrapping also prevents sticky treats from conjoining. Leave no wiggle room. Fill any voids in the box with bubble packaging or foam. Give your package a good shake. If you hear any rattling or feel jostling, reopen the package and add additional cushioning. 2. Create an Elevated Unboxing Experience While your primary concerns are food safety and product quality, you also need to consider your customer’s unboxing experience. Memorable tins and packaging build excitement. A great presentation prompts customers to post their unboxing experience on social media, providing you with free advertising. It can also help boost brand loyalty and encourage repeat sales. How to Create the Perfect Unboxing Experience The primary goal of unboxing is to increase your customers’ value perception. The moment they receive your package, patrons evaluate its quality and whether it was worth purchasing. From the box you send it in to how you organize it, we explain how to create the perfect unboxing experience below: Package your baked goods in branded boxes. It builds anticipation when customers can tell where their package came from as soon as it arrives. Use attractive and sustainable packing materials. Customizing your internal materials ties your overall aesthetic together. If you use sustainable packaging, include an insert that shares this information with your customers. Environmental responsibility can earn respect and boost brand loyalty. Thoughtfully lay out your products. Use dividers to manage your products' placement. Consider the color scheme of the cushioning that you choose and how it compliments your items. Browse the social media hashtags #unboxing and #flatlay for inspiration. Give free samples. Free samples encourage repeat business and introduce your clients to your other product lines. For example, if your customer ordered a shipment of your banana bread, consider adding a sample of your cake pops. Personalize the package. From handwritten notes to customizable gift packaging, personal touches can go a long way in earning brand loyalty. Leverage inserts. Physical inserts carry greater weight than emailed information. You can insert coupons, new flavor/product promotions, or branded stickers. Mark the package as perishable. This is for the customer, not the carrier! If someone sends your baked goods as a gift, you want the recipient to know they should open the box immediately. Apply a "use by" sticker so recipients know exactly when you made the baked good and how long they have to enjoy it. 3. Choose a Shipping Service You must decide how you want to ship your baked goods. While ground services are less expensive, air delivery services help keep your perishable treats fresh, especially if you're sending them several states away. You'll need to weigh your packages because their weight affects shipping fees. Select overnight, next-day, or two-day air shipping to keep temperature-sensitive items safe. Talk to different carriers’ customer service representatives and see which team you feel best working with. The success of your bakery’s e-commerce business depends on customers receiving their orders fast and intact. You need to have a good working relationship with your shipping company. How Much Does It Cost to Ship Baked Goods? The carrier will determine the cost of shipping your baked goods based on the package’s weight, dimensions, and distance traveled. EasyShip provides a shipping rate calculator that compares your shipping options. In most cases, UPS and FedEx are in the same price range and offer the same guarantees Which Shipping Service Is Best for Shipping Baked Goods? The best shipping service for baked goods depends on the volume and type of baked goods you’re sending. We explain the benefits of different carriers below: USPS - The US Postal Service provides the best rates on small, lightweight packages and usually offers fast delivery timelines. UPS - For large and/or heavy shipments, use UPS to get the best rate. Given their expedited shipping times, UPS is also ideal for highly perishable deliveries. FedEx - FedEx offers niche shipping services for frozen food and businesses. The Cheapest Way to Ship Baked Goods In most cases, USPS is the cheapest way to ship baked goods. We break down the cheapest ways to ship baked goods using USPS below: Packages Under One Pound - USPS First-Class Package Service is the cheapest shipping option for packages that weigh less than 1 lb. (16 oz). This service will deliver packages between 1 and 3 business days. Depending on where you’re shipping to, it may only cost $3 or $4 per package. However, First Class Package doesn’t provide USPS insurance, so we recommend purchasing shipping insurance in case something goes wrong. Packages Over One Pound - USPS Priority Mail Cubic prices shipping fees based on a package’s outer dimensions, not its total weight. This allows you to ship fully loaded packages for the same price as lightly loaded packages. USPS Priority Mail Cubic offers 1-3 business day delivery and comes with insurance up to $100. The fine print: the package’s total weight must not exceed 20 pounds and its total volume must be under 0.5 cubic feet. 4. Ship Baked Goods at the Beginning of the Week The best time to ship baked goods is early in the week. Sweets shipped on Fridays often get stuck in sorting facilities over the weekend. The likelihood of delays goes up later in the week, increasing the chances that your customers will receive stale loaves of bread, or worse, sweets that have fallen into the food safety temperature danger zone. Tips for Maintaining Freshness in Shipped Baked Goods While shipping your baked goods early in the week and avoiding Friday shipments will help them arrive on time, there are other practical shipping strategies for maintaining product freshness. Discover the top bakery shipping tips below: Create a shipping timeline. Map out exactly how long it will take you to get your cooled baked goods into your customers' hands. If you can’t get frosted or cream-filled items to your customers quickly, you’ll have to cut these items from your bakery's shipment order offerings. Set order cut-off times. Setting a cut-off time will keep you, your customers, and your shipping carrier on the same schedule. If you're worried about losing clientele, you can always offer a rush delivery service for an additional fee. Offer custom tracking. Use a post-purchase platform like parcelLab to create a customized tracking page. Provide food storage instructions, serving suggestions, and coffee pairing ideas on your custom page. Communicate shipping fees early. State shipping options and fees early in the ordering process. Perishable items require additional packaging and rushed timelines, leading to higher shipping costs than nonperishables. You don’t want customers to make it all the way to check out and then abandon their order because of false shipping cost expectations. Consider including shipping in the sales price. Providing "free shipping" presents an accurate picture of the total expense of ordering your sweets from the start. Adding “shipping included” in the product description helps prevent failed conversion because of shipping fees. Bake with invert sugar. While well-executed shipping is important, the ingredients you use for your baked goods affect their shelf life and freshness, too. Invert sugar retains moisture and keeps baked goods fresh. Sub invert sugar for table sugar to improve your shipped baked goods' quality. Back to Top How to Ship Different Baked Goods Now that you understand the big picture of shipping baked goods, learn how to package each type of baked good for shipping. In the following sections, we break down how to prepare the most popular bakery items for shipping. How to Ship Macarons Follow these steps to protect your delicate French macarons in transit: Place your macarons in a macaron container. These French pastries are extremely fragile, so they require sturdier packaging than other types of cookies. Their strong flavors diffuse, so we recommend using airtight packaging and separating flavors. Use a shipping box that snugly fits your plastic container. You don’t want to leave room for the plastic container to knock around during transit. Slide ice packs around the macaron container. This keeps them fresh and safe to consume. Use packing materials. This keeps the macarons in place during the shipping process. Choose next-day shipping. Work with a carrier you trust. Back to Top How to Ship Bread Homemade bread is time-consuming to make but delicious. Many would rather order bread from a premium bakery than try to make it themselves. However, not all loaves of bread ship as well as others. The best type of bread to ship is quick bread leavened with baking powder or soda such as pumpkin, zucchini, and banana bread. Unyeasted, "quick bread" is heartier and has a longer shelf life than yeast-risen dough. Your next best choice is bread leavened with sourdough. Yeast-leavened bread has the shortest shelf life and is the most fickle, making it the most challenging type of bread to ship. Steps to Ship Bread Bake your bread on the same day you ship it. Make sure the loaf is completely cool before packaging it. Then, follow these steps: Wrap the bread. According to USPS, there are unique methods for wrapping different types of bread. You should double-wrap soft bread in plastic wrap before wrapping it in either a plastic bag or foil. Wrap your stiff, yeast-leavened bread in foil before wrapping it in plastic or adding it to a bread bag. You should wrap crusty bread in plastic wrap or put it in a plastic bag to preserve its moisture before shipping it. While the crust will inevitably soften, this is still preferable to stale bread. Package your bread in a sturdy box. A padded envelope will not provide enough protection for your bread. Choose a box that can house your bread without smashing it. Fill empty spaces in the box with packing supplies. Bubble packaging is an excellent choice for cushioning shipped bread. Seal the box with carton sealing tape. Make sure there aren’t any openings. An airtight box will help keep the bread fresh. Consider Par Baking Your Bread for Shipping Par baking stands for “partially baking”. To par-bake bread, bake the dough 80% of the way and then freeze the loaf. Quick freezing with a blast chiller kills the yeast’s future power and creates a stable inside without browning the crust. The customer can finish the bread by baking it for an additional 10-15 minutes when it arrives. This allows the customer to enjoy a truly fresh, perfectly browned, and warm loaf of bread. How to Ship Banana Bread We explain how to wrap, package, and ship banana bread. You can use this method for other moist, quick loaves such as pumpkin, zucchini, and glazed lemon bread. Lay the plastic wrap on a flat surface. You can use a baking sheet, cutting board, or cleared countertop. Place the loaf on top of the plastic wrap. Leave enough plastic wrap on the left-hand side to fold over the banana bread. Cut a piece of wax paper the size of your loaf. Lay it on top of your bread to preserve its moisture. Wrap the banana bread in your sheet of plastic wrap. Fold the plastic wrap to the left of your banana bread over the loaf. Then, roll the bread down the length of the plastic wrap. Tuck the plastic wrap at the top and bottom of your loaf into the roll as you turn the bread. Freeze the banana bread. Freezing the banana bread before shipping will help keep it fresh. Lay down a sheet of aluminum foil. Not only will aluminum foil protect your loaf, but it will also shield your banana bread from flavor-altering odors. Remove the banana bread from the freezer and place it on the foil. Place the foil on the left side of the banana bread over it, then roll your loaf in the aluminum foil, tucking the top and bottom pieces of foil into your roll as you go. Place your loaf in a sturdy bakery box, tin, or container. Choose a container that fits your loaf snugly. Add packing materials to any empty spaces. Load your container into a similar-sized shipping box. Fill any gaps with packing supplies to secure the container. Seal the box with carton sealing tape. Make sure there aren’t any openings. An airtight box will help keep the banana bread fresh. Ship the banana bread. Work with a carrier you trust and choose either overnight or two-day shipping to ensure product freshness. Back to Top How to Ship a Cake Unfrosted cakes, coffee cakes, Bundt cakes, and pound cakes are the best candidates for shipping. These cakes freeze and defrost well, so shipping them frozen is a great way to preserve product freshness. Frosted cakes are harder to ship than other baked goods, but it is possible with the right tools and techniques. How to Package Cakes for Shipping If you’re wondering how to ship a cake with frosting, this is the best way to package frosted cakes for shipping: Use a cake shipping box. A fitted Styrofoam mailer prevents the cake from jostling in transit. Keep the cake cool. Remove frozen cool packs from the freezer and insert them around the cake. Insert the mailer into a box. You want a mailer that fits the box perfectly and leaves no room on the sides. Seal the box. Tape all its seams and smooth them down. Use stickers to mark the outside of your box. Show where the top of the box is so transporters don’t tip your cake upside down. Mark it as perishable and fragile. Your cake is ready to be shipped. Choose overnight shipping and work with a carrier you have a good relationship with. How to Ship Pound Cake Pound cakes ship best in their disposable aluminum pans. Use wax paper or plastic wrap to cover the pound cake in its pan. Place the wrapped pan in a plastic bag and add it to a cushioned food box. How to Ship Cupcakes Once you've baked and decorated your cupcakes as desired, chill them in the fridge or freeze them for a few hours before packaging them for shipping. This will help preserve their flavor during transport. Because cupcakes are delicate and perishable treats, you need to follow a strict packing process to ensure they arrive intact and safe to consume. To ship cupcakes, you must purchase a cupcake container. Choose between a plastic cupcake box with individual compartments or cupcake bakery box inserts. Either option will shield your cupcakes’ frosting and prevent them from knocking into each other. Protect the cupcakes by placing candy sticks in the center of each cupcake and trimming the sticks so they hit the lid of the cupcake box. This anchors the cupcakes in place and prevents their frosting from smashing into the lid. Cupcake Shipping Supplies List Cupcake box and/or cupcake inserts Candy sticks Ice packs Shipping Box Tape Back to Top How to Ship a Pie Shipping a pie requires two boxes for double protection and plenty of cushioning materials. We explain how to ship a pie below: Make your pie. We suggest sticking to fruit-filled or nut pies and avoiding dairy-laden or meringue-topped options. Freeze your pie. Pies freeze and defrost well. Frozen pies stay fresher and stiffer, helping retain structural integrity in transit. Gather your shipping materials. You’ll need bubble packaging, a pie box, a corrugated cardboard box, and carton sealing tape. Add your frozen pie to the pie box. Pie boxes are specifically designed to prevent structural damage to pies, and some even offer security features such as locking corners. Decorate the pie box. Wrapping the pie box in branded gift paper, adding a handwritten note, or providing pairing/serving suggestions boosts brand loyalty. Wrap the pie box in air bubble packaging. Once you pad it, place the pie in the center of a corrugated cardboard box. Surround the pie with ice packs to keep it cool. Cushioned ice packs serve the dual functions of protecting the pie's food safety and structural integrity. Fill in any gaps. Add packing materials to prevent the inner box from sliding around during transit. Seal the pie box with carton sealing tape. Make sure there aren’t any openings. An airtight box will help keep the pie fresh. Ship your pie overnight. Pies are perishable and need to arrive fast and fresh. How to Ship Brownies Brownies are one of the best baked goods to ship. We explain how to package brownies for shipping so your customers receive fudgy, fresh, and fantastic brownies in the mail. Cut brownies into small squares. Small brownies have less circumference to break down in transit. Wrap brownies individually. If you’re shipping your brownies to a humid environment, wrap each brownie in foil to protect them from humidity. If you’re shipping your brownies to an arid environment, wrap each brownie in plastic wrap to protect them from dry heat. Place the tightly wrapped brownies in the freezer. Frozen brownies are firmer and hold their form in transit, and they stay fresher during transport. Box the brownies. Place the individually wrapped brownies inside a box, tin, or plastic container for protection. Slip the box of brownies into a shipping box. Stuff packing materials around the brownies so they remain fixed during transit. Seal the box with carton sealing tape. Make sure there aren’t any openings. An airtight box will help keep the brownies fresh. Shipping Brownies Tips Wondering how to mail brownies so they arrive as perfect, fudgy squares? We provide the top tips for shipping brownies below: For the freshest results: Ship an entire tray of brownies. Uncut brownies stay freshest, so this is the best shipping option. Lay aluminum foil down in your baking dish before adding the brownie batter so you can easily remove the brownies from the pan after they're baked. Use a large enough piece of aluminum foil to fold over the top of the brownies, and it will double as packaging. For bulk orders: If you want to package a few brownies together, lay parchment paper down at the bottom of their container. Add a layer of brownies and cover them with parchment paper. Repeat until your container is full. For moisture: Adding chocolate chips to the batter helps keep the brownies moist. For food safety: Subbing vegetable oil for butter in the brownie recipe helps them stay safe to consume after transit. Back to Top Shipping Baked Goods FAQ Now you know how to start a shipping service for your bakery and how to package each of your baked goods for shipping. But you still have some questions, and we’re way ahead of you. From a list of baked goods that ship well to a bakery shipping supplies list, we outline the nitty-gritty details of shipping baked goods in this FAQs section. Best Baked Goods to Ship The best baked goods to ship are sturdy and aren’t prone to melting. Whole baked goods stay fresher than cut baked goods, so shipping a pie vs. a slice of pie is always best. Ideally, you want to ship baked goods you can wrap individually. We provide a list of the best baked goods to send in the mail with examples by their type below: Bread - Quick bread such as banana bread, pumpkin bread, and zucchini bread does great in the mail. Cakes - Unfrosted cakes such as pound cakes, Bundt cakes, and coffee cakes arrive intact and fresh after shipping. Pies - Fruit/nut pies like cherry, apple, blackberry, and pecan are perfect for mail-ordered sweets. Cookies - Most cookies with eggs in their recipe ship well. Cookies without sticky mix-ins such as oatmeal raisin, snickerdoodle, and chocolate chip ship best. Bars - Brownies, blondies, and magic bars are some of the best baked goods to ship. List of Baked Goods That Don’t Ship Well Just like certain baked goods hold up well in the mail, others lose their form and flavor. Dairy-rich treats require low temperatures for safe consumption, so they make poor shipping candidates. Items with delicate toppings often arrive smashed and ruined. Sticky sweets, like caramel and toffee, cling to packaging and other baked goods, ruining their presentation. This doesn't mean you can't successfully ship these items with the proper packaging, but it will be more expensive. You will also run a greater risk of product loss and customer dissatisfaction. Discover the riskiest baked goods to ship by their type below: Bread - Yeast-leavened and crusty bread (baguettes, boules, pan Cubano) don't ship well. Frosted Cake - All frostings are poor shipping candidates. Whipped cream and cream cheese frosting are the worst for shipping since they must be refrigerated, making carrot cake, strawberry shortcake, and icebox cake the hardest cakes to ship. Pies - French silk pie, lemon meringue pie, and key lime pie are very hard to ship. Cookies - While they're still relatively shipping-friendly, cookies with sticky ingredients like caramel, frosted cookies, and eggless cookies like shortbread are harder to ship. Bars - Ooey gooey butter bars, chess bars, and caramel bars require careful packaging. Cheesecake - Since cheesecake must maintain a low internal temperature, it is not an easy item to ship. Bakery Shipping Supplies Whether you’re selling baked goods on an e-commerce platform or filling nationwide shipping orders, here are the bakery shipping supplies you’ll need: Aluminum Foil Pans - cake pans, pie pans, tart pans, and Danish pans Bakery Boxes - cake boxes, cookie boxes, box insert kits, pastry boxes Cupcake/Muffin Takeout Containers - cupcake boxes, hinged cupcake containers, cupcake inserts Disposable Baking Pans - disposable paper and plastic bakeware, disposable loaf pans Disposable Baking Tools - cake pop sticks, bun rack covers, piping bags, pipettes Insulated Shipping Supplies - round cake/pie shipping boxes, insulated bubble packaging, food pan shippers, box liners, multi-depth shippers Cardboard Shipping/Mailing Boxes - stock up on a variety of cardboard shipping box sizes Mailing/Shipping Labels - shipping tags, mailings tags, handling labels Cold Packs - gel cold packs, thermal cold packs, flexible ice mats, foam cold packs, ice packs Packing Paper - stock up on wholesale rolls and sheets of packing paper How to Keep Baked Goods Fresh for Shipping To keep your baked goods fresh for shipping, bake and ship your treats on the same day. Make sure your baked goods are completely cool before you package them. If you’re sending shipping-friendly treats, Priority Mail will usually get your goodies to your customers on time. However, for dairy-laden, frosted, or heat-sensitive sweets, you’ll need to select next-day delivery. Back to Top Especially around the holidays, sending baked goods in the mail is a popular way to show each other we care. Whether you're starting an online bakery, hoping to tap into remote markets, or simply want to send your loved ones a care package, reference back to this guide to ship your baked goods. With these best practices in mind, your goodies will arrive fresh, intact, and safe to consume.