
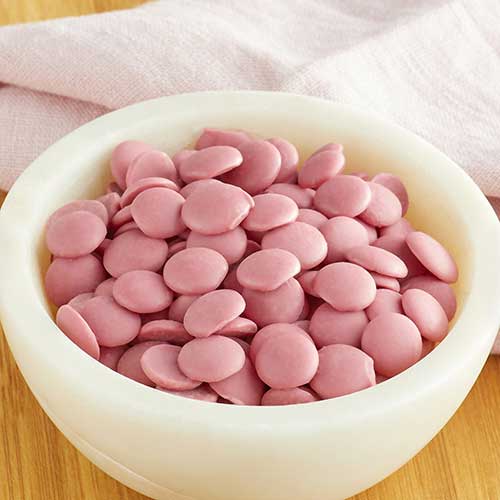
Ruby chocolate is one of the four types of chocolate and is made from ruby cacao beans. Belgian chocolate company Barry Callebaut developed ruby chocolate in 2004 and launched it in its market-perfected form in 2017. Ruby chocolate’s unique color and taste are beloved by pastry chefs everywhere who want to bring a new element to their confectionaries.
Shop All Ruby ChocolateRuby Chocolate Taste
Ruby chocolate’s flavor profile has intense fruitiness, specifically with a fresh berry taste and a hint of sour smoothness.
Where to Buy Ruby Chocolate
You can buy ruby chocolate from online stores, select grocery stores, or pre-made recipes using ruby chocolate from chocolate shops!
How Is Ruby Chocolate Made?
Ruby chocolate goes through an extensive bean-to-bar process:
- The ruby cacao beans are grown and harvested in the Ivory Coast, Ghana, and Ecuador.
- Once harvested, ruby cacao beans are fermented, sun-dried, selected, and shipped to the Barry Callebaut facility in Belgium.
- Once they arrive at the facility, the ruby cacao beans undergo quality checks and begin the process of becoming couverture (high-quality chocolate).
- The beans now undergo whole bean roasting, which means they are roasted in the shell. This practice helps to preserve and develop the delicate flavors and aromas of cocoa beans.
- After roasting, the cocoa nibs are separated from the shell. They are then ground into a fine cocoa liquor, which is then mixed with the other ingredients to create a couverture dough.
- The dough is refined and then conched (agitated by surface scraping) to develop the dough into a liquid as well as unify and balance the flavors.
- Finally, the couverture is tempered and molded into the Callets™ and ready for packaging.
Ruby Chocolate Ingredients
Below are the ingredients in ruby chocolate:
- Sugar
- Cocoa butter
- Non-fat dry milk
- Whole milk powder
- Unsweetened chocolate
- Soy lecithin
- Citric acid
- Natural vanilla flavor
How to Use Ruby Chocolate
Because ruby chocolate has a medium flow and viscosity, it can be used in a ton of different recipes. Here are some ways you can use ruby chocolate:
- Chocolate work
- Mousses
- Pastry cream
- Ice cream
- Cheesecakes
- Dessert sauces
- Frostings
- Icings
It’s recommended to use ruby chocolate as purely as possible to really let the chocolate shine on its own, meaning that tempering and using it for chocolate work is best. Something to note: when baking with ruby chocolate, the vibrant pink color tends to fade a bit, but you can use natural food colorings like beetroot powder to bring back the pink hue.
What to Pair with Ruby Chocolate
Because ruby chocolate’s taste is so unique yet universal, ingredient pairing can range from traditional flavors like different types of vanilla to unexpected flavors like global cheeses or different tropical fruits. Here are ingredient pairing ideas for ruby chocolate:
- Almonds
- Pistachios
- Strawberries
- Raspberries
- Stone fruits
- Passion fruit
- Currants
- Cherries
- Matcha
- Rose
- Dessert wines
- Champagne
- Beers
- Bourbon
- Caviar
- Goat cheese
- Camembert
- Honey
- Vanilla
- Basil
- Mint
- Edible flowers
How to Store Ruby Chocolate
Chocolate is sensitive to air, light, and humidity, and can soak up other strong smells that are nearby. To avoid all of these mishaps, store your ruby chocolate in an air-tight container that is not see-through, or at the very least opaque. The chocolates should be kept in a cool, dark corner away from light. Never store chocolate in the refrigerator. If not stored properly, ruby chocolate can turn to a grayish color.
Is Ruby Chocolate Vegan?
No, ruby chocolate is not vegan. However, ruby chocolate is vegetarian-friendly!
Is Ruby Chocolate Gluten-Free?
Yes, ruby chocolate is gluten-free. It is processed in a facility that does not have gluten or wheat present.
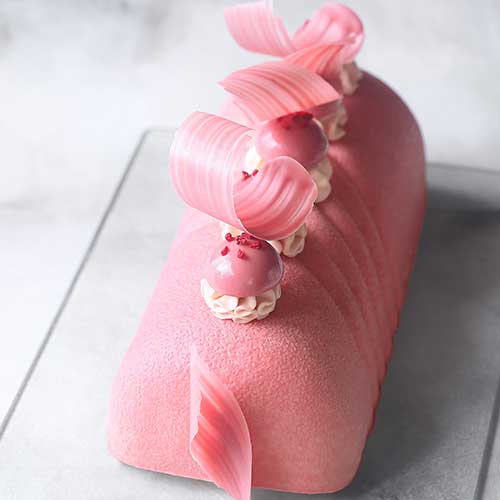
As the fourth type of chocolate after dark, milk, and white, ruby chocolate has a lot to live up to. Between its brilliant color and unique flavor, ruby chocolate creates a whole new confectionary experience for pastry chefs. It also makes a great gift for bakers who want to try this chocolate for the first time, or simply can’t get enough!
Related Resources

A Guide to Chocolate Candy Making
Chocolate candy making is a delicious and rewarding craft that allows you to create sweet treats for any occasion. Whether you're a seasoned confectioner or a beginner looking to try your hand at chocolate candy making, there are a few tips that can help you achieve the most consistent results. We'll cover some of the best practices for working with chocolate and help you identify the types of chocolate that make the most tempting and delectable candies. Learn all about the basics of chocolate candy making: Chocolate Candy Supplies Candy Making Techniques Best Chocolate for Candy Making How to Use Chocolate Molds How to Color Chocolate How to Store Chocolate Chocolate Candy FAQ Why Start a Chocolate Candy Making Business? The allure of chocolate is undeniable, and the demand for high-quality, artisanal chocolates continues to rise. For individuals looking to turn their passion for chocolate into a profitable side job or business venture, starting a chocolate candy making business can be a rewarding and lucrative endeavor. The profit margins for handmade chocolates are often higher than mass-produced chocolates, making it an attractive business opportunity. By sourcing quality ingredients and creating unique chocolate confections, you can command premium prices for your products. Keep reading to learn the basics of chocolate candy making and how to produce the best quality products. Chocolate Candy Making Supplies Before you get started, you'll need some essential candy making supplies. These tools will help you master the techniques needed to create professional results with chocolate: Double Boiler: A double boiler is a crucial tool for melting chocolate gently and evenly. It consists of two pots - one that holds simmering water and another that fits on top to hold the chocolate. This indirect heat prevents the chocolate from burning or seizing, resulting in a smooth and glossy finish. Chocolate Thermometer: Precision is key when working with chocolate, and temperature control is crucial for tempering and molding. A chocolate thermometer allows you to monitor the temperature accurately, ensuring that your chocolate is at the perfect consistency for dipping, molding, or tempering. Chocolate Molds: Chocolate molds come in a range of shapes and sizes, allowing you to create an array of beautifully designed candies. From classic shapes like hearts and stars to intricate designs for special occasions, keeping a variety of molds on hand can elevate your chocolate creations. Offset Spatula: An offset spatula is a versatile tool that helps you spread, smooth, and decorate chocolate with precision. Its angled blade allows you to work efficiently when you're coating truffles, spreading ganache, or creating intricate designs on your candies. Piping Bags and Tips: Piping bags and tips are essential for adding decorative touches to your chocolate candies. Whether you're drizzling chocolate, piping fillings, or creating intricate designs, having a set of piping bags and tips can take your creations to the next level. Cooling Racks: Properly cooling chocolate candies is crucial for achieving a smooth and shiny finish. Cooling racks allow air to circulate around the candies, helping them set and harden evenly. They also prevent condensation from forming, which can affect the texture and appearance of your chocolates. Chocolate Scraper: A chocolate scraper is a handy tool for smoothing out the surface of your chocolate candies and removing any imperfections. Its flat edge helps create a clean and polished finish, perfect for professional-looking confections. Chocolate Candy Making Techniques If you've ever wondered how chocolatiers produce the perfect batch of candies, we'll let you in on a secret. Getting professional results comes down to mastering a few key techniques. Learn these methods, and with practice, you'll start to see the improvement in your chocolate candies: Tempering Chocolate: Tempering chocolate is a crucial technique that involves heating and cooling chocolate to specific temperatures to ensure a glossy finish, a satisfying snap, and a stable crystalline structure. This process is vital for achieving that professional-looking sheen on your chocolate candies. Molding: Using molds is a popular technique in chocolate candy making that allows you to create beautifully shaped candies with intricate designs. Mastering the art of molding will give your chocolates a polished and professional appearance. Enrobing: Enrobing is the process of fully coating a center or filling with a layer of chocolate. This technique is commonly used in creating truffles, bonbons, and other filled chocolates, resulting in a luxurious and decadent treat with a smooth and uniform coating. Hand-Dipping: Hand-dipping involves coating centers or fillings by hand in melted chocolate. This technique allows for more creative freedom and customization, as you can experiment with different coatings, toppings, and drizzles to add visual appeal and flavor complexity to your chocolate candies. Decorating: Decorating is the finishing touch that can take your chocolate candies from ordinary to extraordinary. Whether you sprinkle on edible glitter, dust with cocoa powder, or add decorative accents like edible flowers or gold leaf, decorating your chocolates adds a touch of elegance and whimsy. By mastering these essential techniques in chocolate candy making, you'll be well on your way to creating stunning and delicious confections that will impress your customers. Best Chocolate for Candy Making Did you know that choosing the right type of chocolate is key to achieving the perfect flavor and texture with your candies? For beginners, using high-quality chocolate chips or melting wafers is a great option because they are easy to work with and readily available in most stores. If you're looking to elevate your candy making game, couverture chocolate with a high cocoa butter content is ideal for a smooth and glossy finish. Couverture Chocolate: Couverture chocolate is a high-quality chocolate that contains a higher percentage of cocoa butter compared to regular chocolate. This makes it a top choice for both melting and tempering. Couverture chocolate is commonly used by professional chocolatiers because its smooth texture and glossy finish make it ideal for creating professional-looking chocolates. Chocolate Wafers: Chocolate wafers are convenient and easy to melt, making them a popular choice for home candy makers. These wafers are specifically formulated for melting and are available in a variety of flavors, such as dark, milk, and white chocolate. They melt smoothly and can be easily tempered for a glossy finish. Chocolate Callets: Chocolate callets are small, uniform chocolate drops that are specifically designed for melting and tempering. They are made from high-quality chocolate that is finely crafted to ensure a smooth and consistent finish. These little drops of chocolate goodness are perfect for creating a variety of confections, from truffles to chocolate bars to dipped fruits. Chocolate Bars: High-quality chocolate bars can also be used for melting to create delicious candies. Look for bars with a high cocoa content and avoid chocolates with added ingredients like nuts or caramel, as they can affect the melting process. Chop the chocolate bars into small pieces for even melting. Chocolate Chips: While chocolate chips are a convenient option for baking, they can also be used for melting to make chocolate candies. Avoid using chocolate chips for tempering because they won't produce a smooth, glossy product. By selecting the right type of chocolate for melting, you can elevate your chocolate candy making game and create delectable treats that will impress your customers or guests. Just make sure that you understand the melting points of the products you use so that you can achieve the smoothest texture and consistency. Back to Top How to Use Chocolate Molds Making chocolate candies with molds is a popular and efficient way to create uniform and professional-looking treats. Here are some tips and steps to guide you through the process: Select the Right Mold: Choose high-quality silicone or polycarbonate molds specifically designed for chocolate making. Ensure that the mold is clean and completely dry before use. Temper the Chocolate: Properly tempering your chocolate is crucial for achieving a glossy finish and a smooth texture. Follow the tempering process by melting the chocolate, cooling it slightly, and then gently reheating it to the correct temperature. Fill the Mold: Pour the tempered chocolate into the mold, ensuring that each cavity is filled to the top. Tap the mold gently on the countertop to remove any air bubbles and to level the chocolate. Empty Excess Chocolate: Turn the mold upside down over a clean sheet of parchment paper or a baking tray to allow excess chocolate to drip out. Use an offset spatula to scrape off any excess chocolate from the top of the mold. Set the Chocolate: Place the mold in the refrigerator for the chocolate to set. The time required for the chocolate to harden will depend on the size and thickness of the candies. Releasing the Candies: Once the chocolate has completely set, gently flex the mold to release the candies. If the chocolates do not release easily, they may need more time to set in the refrigerator. Storing the Candies: Store the chocolate candies in a cool, dry place away from direct sunlight and strong odors. Properly stored chocolates can last for several weeks. By following these steps and tips, you can create beautifully molded chocolate candies that are sure to impress your customers or guests. Enjoy the process of chocolate making and experiment with different flavors and designs to add a personal touch to your creations. How to Color Chocolate Adding a pop of color to your chocolate candies can take your creations to the next level, especially during holidays like Easter or Valentine's Day. Coloring chocolate is a fun and creative way to customize your treats for any occasion. Here are some tips to help you master the art of coloring chocolate: Use Oil-Based Food Coloring When coloring chocolate, it's important to use oil-based food coloring instead of water-based coloring. Water-based coloring can cause the chocolate to seize and become unusable. Oil-based coloring blends seamlessly with the chocolate, giving you vibrant and consistent results. Start with White Chocolate: If you're looking to achieve a specific color, start with white chocolate as your base. White chocolate is easier to color and allows you to achieve a wide range of hues. Simply melt the white chocolate, add the oil-based food coloring, and mix until you reach your desired shade. Gradually Add Color: When coloring chocolate, it's best to add the food coloring a little at a time. This allows you to control the intensity of the color and avoid adding too much, which can affect the texture and taste of the chocolate. Remember, you can always add more color, but you can't take it away. Test the Color: Before proceeding with your chocolate candy making, it's a good idea to test the color on a small batch of chocolate. This way, you can adjust the shade if needed before coloring the entire batch. By following these simple tips, you can easily color chocolate like a pro and create stunning and delicious candies that are sure to impress. Let your creativity shine and have fun experimenting with different colors and designs to elevate your chocolate creations. How to Package and Store Chocolate Candies When it comes to making delicious chocolate candies, packaging and storing them properly is essential to maintain their quality and flavor. Whether you're a professional confectioner or just getting started with candy making, here are some tips to help you package and store your chocolate creations like a pro: Choose the Right Packaging: Opt for packaging that not only looks appealing but also protects your chocolate candies from moisture, light, and air. Consider using food-safe cellophane bags, clear plastic boxes, or decorative tins to showcase your treats. Wrap Individually: To prevent your chocolate candies from sticking together or absorbing unwanted flavors, wrap each piece individually in wax paper or parchment paper before placing them in the packaging. This also makes it easier for your customers or guests to grab a single piece without them all sticking together. Add a Personal Touch: Consider adding a personalized touch to your packaging by including custom labels, ribbons, or stickers with your logo or a special message. This not only enhances the presentation of your chocolate candies but also creates a memorable experience for the recipient. Store in a Cool, Dry Place: Chocolate is sensitive to temperature and humidity, so it's important to store your candies in a cool, dry place away from direct sunlight and heat sources. Ideally, keep them in a pantry or cupboard with a consistent temperature between 60-70°F. Avoid Refrigeration: While it may be tempting to refrigerate your chocolate candies to prolong their shelf life, this can actually cause them to develop a whitish film known as "bloom." Instead, store them at room temperature for the best taste and texture. Check Expiration Dates: If you're making chocolate candies for commercial purposes, be sure to label your packaging with an expiration date to ensure your customers enjoy them at their freshest. Chocolate doesn't go bad necessarily, but it can lose it lose its flavor or become discolored. By following these simple packaging and storage tips, you can ensure that your chocolate candies remain fresh, flavorful, and visually appealing for your customers or guests to enjoy. Learn more about the best practices for shipping your confections in our chocolate shipping guide. Chocolate Candy Making FAQ If you're still looking for answers, check out the common questions about chocolate candy making below: Why Is My Melted Chocolate Grainy? Grainy chocolate can be a common issue that arises when the chocolate is overheated or comes into contact with even a small amount of moisture. When chocolate is heated too quickly or at too high of a temperature, the cocoa butter can separate from the cocoa solids, resulting in a grainy texture. To prevent this, it's important to melt your chocolate slowly and gently, stirring frequently to ensure even heating. Is Melting Chocolate the Same as Tempering? While both processes involve heating chocolate, melting and tempering serve different purposes. Melting chocolate simply involves heating it until it reaches a smooth and liquid consistency, making it easier to work with for dipping or coating. On the other hand, tempering chocolate is a more precise technique that involves heating, cooling, and re-heating chocolate to specific temperatures to achieve a glossy finish, snap, and stable crystalline structure. What Are Candy Melts? Candy melts, sometimes called coating wafers, are convenient and easy to use for melting and dipping. They're ideal for coating cake pops, pretzels, or molded candies. One key advantage of candy melts is that they don't need to be tempered. Candy melts are easy to work with, but they don't have the rich taste of chocolate because they don't contain cocoa butter. Are Candy Melts the Same as Melting Wafers? No, candy melts are not the same product as melting wafers. Chocolate melting wafers are made from high-quality chocolate and have a rich, indulgent flavor. These wafers are perfect for tempering, which is a process that involves heating and cooling chocolate to give it a smooth and glossy finish. If you need a quick, colorful coating, reach for candy melts. Choose chocolate wafers or other high-quality chocolates when you want to create truffles, bonbons, or other premium chocolate treats. Back to Top Now that you're familiar with the supplies, techniques, and types of chocolate used in candy making, you're ready to start your confectionary journey. Whether you're training to become a chocolatier or opening your own candy store, chocolate candy making can be a lucrative venture.

How to Make Ruby Chocolate Truffles
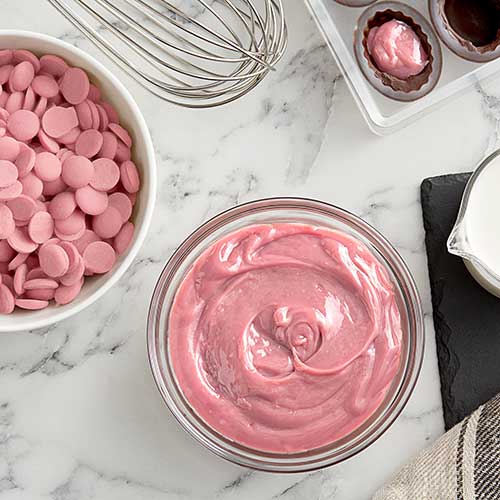
It's not every day that a new type of chocolate is invented! Ruby chocolate isn't just white chocolate with pink food coloring, it's a brand-new type of chocolate with a natural pink hue from ruby cocoa beans. If you're as excited as we are, check out our easy ruby chocolate truffle recipe. Can't wait to get your hands on some ruby chocolate? Click below. Shop for Ruby Chocolate Jump to Recipe Watch Our Video Ruby Chocolate Truffles Make a show-stopping confection and impress your guests by introducing them to ruby chocolate. Our ruby chocolate truffles are dipped in white chocolate and decorated three ways - topped with chopped cranberries, sprinkled with sparkly pink luster dust, and drizzled with melted red chocolate. Choose your favorite or try all three styles. How to Make Ruby Chocolate Truffles Watch our video tutorial for ruby chocolate truffles or read our recipe below: <iframe itemprop="embedURL" width="560" height="315" src="https://www.youtube.com/embed/4QSgKitfBuk" frameborder="0" allowfullscreen></iframe> What Special Equipment Do I Need? To get started with this ruby chocolate recipe, you'll need the following items: Double Boiler - Pair a double boiler with an induction cooking unit for the most precise control while heating the white and red chocolate chips. If you don't have a double boiler on hand, place a bowl over a saucepan of simmering water. Just make sure the water does not touch the bottom of the bowl because the chocolate will heat too quickly and burn. Small Saucepan - You will heat the heavy cream in a small saucepan. Medium Glass Bowl - The ruby chocolate will be gently melted by combining it with hot heavy cream in a medium-sized glass mixing bowl. Sheet Pans lined with parchment paper - Catch any melted chocolate drips with a sheet pan. Cooling Rack - Your ruby chocolate truffles will cool quickly on a baker's cooling rack. Rounded Scoop - Use a #70 round scoop (.5 ounce) for consistently sized truffles. Dipping Tools - Dipping tools make it easy to dip your truffles into melted chocolate. Luster Dust - Luster dust is an edible, shimmery powder that adds sparkle to your desserts. Try any shade you like, but we recommend pink. Tips from the Test Kitchen Shown here: Combining heavy cream with ruby chocolate. Ruby chocolate has its own unique makeup, so you'll find that it doesn't behave the same way that other types of chocolate do. Here are some tips from our test kitchen to help you achieve the best results with ruby chocolate: Color change - When you add additional ingredients to ruby chocolate (like milk or cream), the vibrant pink color will become muted. This is completely normal. If you want to brighten the chocolate, simply add a couple of drops of an oil-based food coloring. Do not use gel or liquid food coloring. Melting the chocolate - Ruby chocolate melts differently than other chocolates and may "break" or separate when heated. Our method of adding the hot cream to the chocolate is a gentle way to melt the chocolate and works better than heating the ruby chocolate directly. If the chocolate does start to separate on you, whisk it quickly to reincorporate the ingredients. Chocolate won't melt - If the ruby chocolate hasn't melted for you per our directions, you can use a microwave. But be warned! It's very easy to overheat chocolate in a microwave. You don't want to ruin your precious ruby chocolate, so only place the chocolate mixture in the microwave for 15-second increments. Let it sit for a minute and stir before trying again. Ruby Chocolate Truffles Recipe Add these colorful ruby chocolate truffles to your display case or use them in a festive dessert charcuterie board. They might look fancy, but they're surprisingly easy to make. Check out our test kitchen tips above before you get started with this recipe: Recipe by: Ronne Day, WebstaurantStore Food Stylist Yield: 20 to 24 truffles Total Time: 120 minutes Shown here: Drizzling melted red chocolate with a fork. Ruby Truffle Ingredients 1 pound Callebaut Ruby Couverture Callets, finely chopped 4 ounces heavy cream 1 1/2 pound Regal white melting chips 1/4 cup dried cranberries, finely chopped Pink luster dust 1/2 pound Regal red melting chips 1 - 2 Tablespoons of vegetable oil Directions Note: Wear gloves throughout this process. Place chopped ruby chocolate callets in medium glass bowl and set aside. In small saucepan over medium heat, warm heavy cream until steaming but not boiling. Pour cream over ruby chocolate and allow to rest for 1 minute. Do not skip this resting period. The chocolate will continue to melt as it sits. Gently stir ruby chocolate and cream mixture until chocolate is melted. Place mixture in refrigerator for 8 hours or overnight until firm. Dip .5 ounce scoop into ruby chocolate mixture and release truffles into your hands. Roll between your palms to make evenly portioned balls. You should have 20 to 24 truffles. Place on a sheet pan lined with parchment. Refrigerate 4 hours or until completely solid. Before decorating truffles, line sheet tray with parchment paper and place baker's rack on top. Heat white chips in double boiler until just melted. Whisk in up to 5 teaspoons of vegetable oil to increase fluidity, if necessary. Using two forks or truffle dipping tool, dip truffles into melted white chocolate and transfer to baker's rack. While freshly coated in white chocolate, top 1/3 of truffles with chopped cranberries. Transfer all truffles to refrigerator for 1 hour. After coating has set, gently brush luster powder onto 1/3 of truffles. Allow to sit for 30 minutes. Decorate the remaining 1/3 truffles. Melt red melting chips using the same process as white melting chips. Whisk in vegetable oil, 1 teaspoon at a time, until chocolate has a fluid consistency. Using the tines of a fork or a whisk, drizzle a little melted red chocolate over remaining 1/3 truffles. Allow to sit for 30 minutes to set. Cover and refrigerate all decorated truffles until ready to serve. Truffles will be good for two weeks in the refrigerator.

What Is White Chocolate?
White chocolate boasts a pale ivory color and buttery, sweet, and milky flavor that is perfect for enjoying solo or as a sweet and creamy enhancement to coffee drinks and confectionaries. White chocolate has an albino appearance because it doesn't contain any cocoa solids. The absence of cocoa solids makes some skeptics question if white chocolate is "real" chocolate or a different type of candy altogether. We explain everything you need to know about this sweet treat so you can incorporate it into your confections or make chocolate candies. What Is White Chocolate Made Of? Unlike dark or milk chocolate which uses multiple parts of the cocoa bean, white chocolate contains no cocoa powder or chocolate liquor. Instead, it is primarily made of cocoa butter combined with sugar, milk solids, and desired flavoring agents like vanilla. Cocoa butter is the fat extracted from cocoa beans and provides white chocolate with its trademark smooth and rich mouthfeel. Is White Chocolate Chocolate? <iframe itemprop="embedURL" width="560" height="315" src="https://www.youtube.com/embed/Nxr_bL6_MbY?si=acn8LJ37lYn8XB2U" frameborder="0" allowfullscreen></iframe> Because it doesn’t contain cocoa powder, people debate whether white chocolate is real chocolate. According to the Food and Drug Administration (FDA), white chocolate is a legitimate type of chocolate. In 2002, the FDA established a standard of identity for white chocolate, ensuring it meets specific criteria. This standard applies to imported and domestic white chocolate products, ensuring consistency and quality. To meet FDA standards, white chocolate must contain specific components. White chocolate must contain at least 20% cocoa butter, 14% total milk solids, 3.5% milkfat, and no more than 55% sugar. These precise proportions ensure that white chocolate maintains its characteristic texture and flavor. What Does White Chocolate Taste Like? Known for its sweet, buttery, and creamy flavor, white chocolate boasts hints of vanilla and fresh milk. White chocolate's subtle taste is an excellent base for incorporating other flavors. Whether it's fruity notes, nutty undertones, or caramel accents, white chocolate provides a versatile canvas for creating a wide range of flavor combinations. How Is White Chocolate Made? Making chocolate is a complex process, and white chocolate follows unique steps. We explain how chocolate shops make white chocolate below: Ingredients Selection: The main components of white chocolate are cocoa butter, sugar, milk solids, and vanilla. Cocoa butter is the key ingredient that provides the rich and smooth texture of white chocolate. The higher quality of each element produces a better-tasting white chocolate. Cocoa Butter Extraction: To make white chocolate, candy makers extract cocoa butter from cocoa beans. The cocoa beans are roasted, cracked, and then pressed to separate the cocoa butter from the cocoa solids. Mixing Ingredients: Once the cocoa butter is extracted, it is combined with sugar, milk solids, and vanilla. The mixture is heated and stirred until all the ingredients are well combined. Conching Process: The mixture is then subjected to a process called conching, which involves continuously stirring and aerating the mixture to develop the smooth and creamy texture of white chocolate. This process also helps refine the flavor of the white chocolate. Tempering: After conching, the white chocolate is tempered to create a glossy finish and a satisfying snap when broken. Chocolate tempering involves heating and cooling the chocolate to specific temperatures while continuously stirring to stabilize the cocoa butter crystals. Molding and Setting: Once tempered, the white chocolate is poured into molds and set at a controlled temperature. This step ensures that the white chocolate solidifies properly and retains its shape. Packaging: After the white chocolate sets, it is removed from the molds, inspected for quality, and packaged for distribution and consumption. White Chocolate Melting Point White chocolate has a low melting point around 100 to 110 degrees Fahrenheit. For reference, dark chocolate has a melting point ranging from 113 to 120 degrees Fahrenheit and most milk chocolate melts between 104 and 115 degrees Fahrenheit. This low melting temperature makes white chocolate one of the trickiest chocolates to ship, requiring careful handling and temperature control to prevent melting during transit. Is White Chocolate Good for You? White chocolate falls short of its dark chocolate counterpart in health benefits. Many of the health benefits associated with chocolate come from cocoa solids, and white chocolate does not contain any cocoa solids. It's high in saturated fats due to its cocoa butter content, which can increase cholesterol levels and the risk of heart disease. White chocolate also contains a significant amount of sugar. While white chocolate may be a delicious indulgence, it is important to enjoy it in moderation. If you are looking for a healthier alternative, dark chocolate with a higher cocoa content is a better choice as it contains antioxidants and other beneficial compounds that can impact health positively. White Chocolate Purchasing Considerations When purchasing chocolate for commercial use, there are several important considerations to help select the best white chocolate for your needs. Cocoa Butter Content: Check the cocoa butter content when purchasing white chocolate. Premium white chocolate has a high percentage of cocoa butter, resulting in a smoother texture and richer flavor. Brand Reputation: Choosing a reputable brand when purchasing white chocolate is crucial as it can guarantee consistency in quality and flavor. Established brands often have strict quality control measures to ensure their products meet the highest standards. Packaging: Opt for white chocolate that is well-packaged to maintain its freshness and prevent any contamination. Look for products sealed in airtight packaging to preserve their flavor and texture. Certifications: Consider purchasing white chocolate certified by reputable organizations such as Fair Trade or Rainforest Alliance. These food certifications ensure it was sourced ethically and sustainably, which can be important to customers looking to support responsible practices. Usage: Determine the intended use of the white chocolate before purchasing. Whether you are using it for baking, confectionery, or as a topping, selecting the right type of white chocolate with the appropriate melting point and flavor profile is essential for achieving the desired results. Price: While price is a consideration, it should not be the sole determinant when purchasing white chocolate. Investing in higher-quality white chocolate may result in better-tasting products and satisfied customers, ultimately benefiting your business in the long run. White chocolate has a wide range of applications in the commercial food industry. Its creamy texture and sweet flavor make it a versatile ingredient for creating delectable desserts, pastries, and confections. Whether used in baking, as a coating for candies, or as a flavoring in beverages, white chocolate adds a touch of elegance and indulgence to any dish.